Home Assistant~
Home Assistant is an open source home automation solution that puts local control and privacy first.
Tasmota communicates with Home Assistant using MQTT. Before going any further, make sure MQTT is properly set up in Home Assistant and Tasmota.
Home Assistant can add Tasmota devices using:
- Official Tasmota integration - preferred and automatic instant discovery of entities
- Manual configuration by editing configuration.yaml - recommended for marginal use cases, e.g., TuyaMCU fan devices
Tasmota Integration~

Once you configure the Home Assistant integration every new Tasmota device with SetOption19 0 set will be discovered automatically.
All Tasmota devices will be listed in their own Tasmota card in Configuration - Integrations menu in Home Assistant.
Warning
Do not change the FullTopic in order to use this feature. Leave it as default.
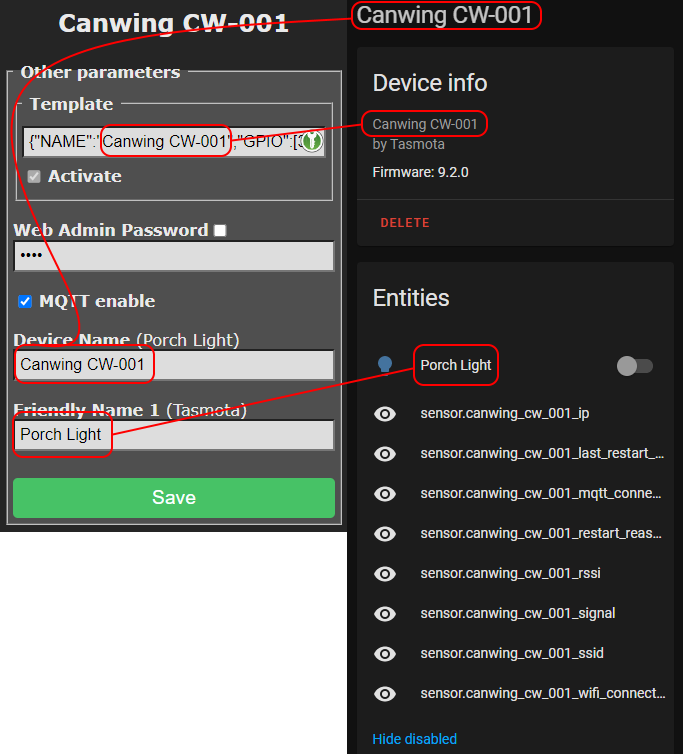
Tasmota uses DeviceName to name the device in Tasmota integration and FriendlyName<x> to name power outputs (switch or light entities in HA).
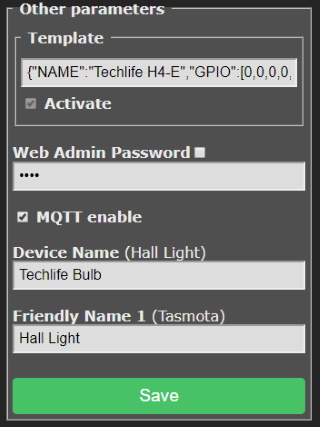
Use templates to change the Module name
Setting the template name will change the Module name as well which will be reflected in Home Assistant. This helps in identifying when dealing with a large number of devices. It's nicer than having 10 Sonoff S31's or a bunch of TuyaMCU's" 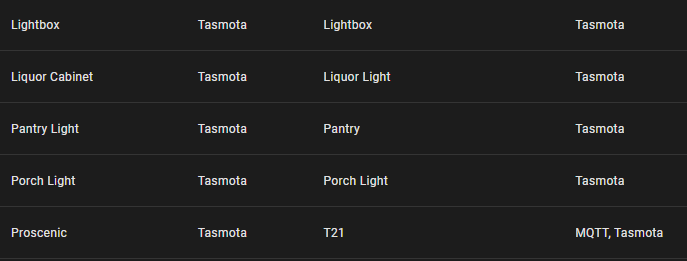
Bug
If you are using Home Assistant OS MQTT add-on add the following to the ACL file (user section or general section): topic write tasmota/discovery/# to give Tasmota devices write access to the discovery topic.
Supported Entities~
- Lights as
lightentities.
Single channel Dimmers, RGB lights, RGB lights with Color Temperature control and RGB lights with White control are supported. - Relays as
switchentities WithSetOption30 1all relays one the device will be added as light entities instead - Sensors as
sensorentities - Switches as
binary_sensorentities orautomation triggersdepending onSwitchModeused whenSetOption114 1 - Buttons as automation triggers when
SetOption73is enabled - Shutters as cover entities. Currently only shutter modes 1 to 4 are supported. Shutter mode 5 and Tuya shutters are not supported.
- Devices configured as iFan02 or iFan03 as fan entities. TuyaMCU fans are not supported.
- Each discovered device will by default add 8 disabled sensors. Enable the ones you need. You cannot delete them, they will simply be re-added on a restart.
Types of devices not listed above still require manual configuration.
If you're running Tasmota on ESP32 you can use Home Assistant Controls in Berry to discover more complex entities (pull-down lists, number sliders, etc)
Zigbee and Bluetooth devices paired in Tasmota will NOT be discovered in Home Assistant
Removing devices~
You cannot as long as Home Assistant support is enabled in your Tasmota binary. Disable the device in Home Assistant instead.
Deleting them from Home Assistant while Tasmota device is still active will eventually rediscover all the entities.
Supplemental Custom Discovery Message~
You can use MQTT Discovery in HA to add sensors and other entities that are not discovered through Tasmota integration and associate them with an already discovered device.
When creating the MQTT discovery JSON add this device identifier ,"device":{"connections":[["mac","%macaddr%"]]} where %macaddr% is the mac address of the device without :. When used in a rule variable %macaddr% will be replaced automatically.
There are Home Assistant Blueprints for specific device types to create needed entities at out blueprints GitHub. Look for the icon in templates to one-click import the configuration automation.

Examples of creating custom discovery messages:
Editing configuration.yaml~
Adding devices manually is done by editing the configuration.yaml file and adding appropriate blocks of yaml code to the corresponding section.
After every change to the configuration.yaml file you'll need to restart the MANUALLY CONFIGURED MQTT ENTITIES in Server Controls to apply the changes.
The advantage of manually configuring a device is that you maintain control of all aspects of the configuration.
All the configurations are just examples.
You need to be familiar with Home Assistant's configuration structure and procedures.
Straight copy paste of the given examples into configuration.yaml will probably not work for you.
If you are using a localized (non-english) version be sure to check the correct spelling and cases for values:
- 'payload_available'
- 'payload_not_available'
- 'payload_on'
- 'payload_off'
Tip
If you want the power states to be persistent in Tasmota and Home Assistant set PowerRetain 1 instead of using retain: true in Home Assistant
When using unique_id: make sure it's unique to each entity
When unique_id is set, Home Assistant will allow some entity customization from the UI such as changing the name or icon.
Switches~
Add in Home Assistant using the MQTT Switch integration.
Required Commands
SetOption59 1 - enables sending of tele/%topic%/STATE on POWER and light related commands for faster updates
Single Switch
If SetOption26 is enabled, use POWER1 instead of POWER
mqtt:
  switch:
    - unique_id: tasmota_switch
      name: "Tasmota Switch"
      state_topic: "stat/tasmota/RESULT"
      value_template: "{{ value_json.POWER }}"
      command_topic: "cmnd/tasmota/POWER"
      payload_on: "ON"
      payload_off: "OFF"
      availability_topic: "tele/tasmota/LWT"
      payload_available: "Online"
      payload_not_available: "Offline"
Multiple Switches
When a device has more than one POWER output (multiple relays or a mix of relays and lights) use corresponding POWER<x> (POWER1, POWER2, etc)
mqtt:
  switch:
  - unique_id: tas_switch_1
    name: "Tasmota Switch 1"
    state_topic: "stat/tasmota/RESULT"
    value_template: "{{ value_json.POWER1 }}"
    command_topic: "cmnd/tasmota/POWER1"
    payload_on: "ON"
    payload_off: "OFF"
    availability_topic: "tele/tasmota/LWT"
    payload_available: "Online"
    payload_not_available: "Offline"
  - unique_id: tas_switch_2
    name: "Tasmota Switch 2"
    state_topic: "stat/tasmota/RESULT"
    value_template: "{{ value_json.POWER2 }}"
    command_topic: "cmnd/tasmota/POWER2"
    payload_on: "ON"
    payload_off: "OFF"
    availability_topic: "tele/tasmota/LWT"
    payload_available: "Online"
    payload_not_available: "Offline"
  - unique_id: tas_switch_3
    name: "Tasmota Switch 3"
    state_topic: "stat/tasmota/RESULT"
    value_template: "{{ value_json.POWER3 }}"
    command_topic: "cmnd/tasmota/POWER3"
    payload_on: "ON"
    payload_off: "OFF"
    availability_topic: "tele/tasmota/LWT"
    payload_available: "Online"
    payload_not_available: "Offline"
Tip
If you are using a switch device to control a light you may want to use MQTT Light integration instead.
Simply replace switch: with light: in the configuration keeping everything else the same.
Lights~
Add in Home Assistant using the MQTT Light integration.
All configurations require SetOption59 1 - enables sending of tele/%topic%/STATE on POWER and light related commands
Optional Commands
Fade on - makes transitions smoother
Speed 5 - set transition speed
Dimmer
Used for dimmers and dimmable lights (single channel lights).
mqtt:
  light:
    - name: "Dimmer"
      command_topic: "cmnd/tasmota/POWER"
      state_topic: "tele/tasmota/STATE"
      state_value_template: "{{value_json.POWER}}"
      availability_topic: "tele/tasmota/LWT"
      brightness_command_topic: "cmnd/tasmota/Dimmer"
      brightness_state_topic: "tele/tasmota/STATE"
      brightness_scale: 100
      on_command_type: "brightness"
      brightness_value_template: "{{value_json.Dimmer}}"
      payload_on: "ON"
      payload_off: "OFF"
      payload_available: "Online"
      payload_not_available: "Offline"
RGB Light
Should also be used with lights using White Blend Mode
SetOption17 1 - enables color status in decimals
mqtt:
  light:
    - name: "RGB Light"
      command_topic: "cmnd/tasmota/POWER"
      state_topic: "tele/tasmota/STATE"
      state_value_template: "{{ value_json.POWER }}"
      availability_topic: "tele/tasmota/LWT"
      brightness_command_topic: "cmnd/tasmota/Dimmer"
      brightness_state_topic: "tele/tasmota/STATE"
      brightness_scale: 100
      on_command_type: "brightness"
      brightness_value_template: "{{ value_json.Dimmer }}"
      rgb_command_topic: "cmnd/tasmota/Color2"
      rgb_state_topic: "tele/tasmota/STATE"
      rgb_value_template: "{{ value_json.Color.split(',')[0:3]|join(',') }}"
      effect_command_topic: "cmnd/tasmota/Scheme"
      effect_state_topic: "tele/tasmota/STATE"
      effect_value_template: "{{ value_json.Scheme }}"
      effect_list:
        - 0
        - 1
        - 2
        - 3
        - 4
      payload_on: "ON"
      payload_off: "OFF"
      payload_available: "Online"
      payload_not_available: "Offline"
RGB+W Light
In this configuration RGB and white cannot be on at the same time. See Lights for options.
SetOption17 1 - enables color status in decimals
mqtt:
  light:
    - name: "RGB+W Light"
      command_topic: "cmnd/tasmota/POWER"
      state_topic: "tele/tasmota/STATE"
      state_value_template: "{{ value_json.POWER }}"
      availability_topic: "tele/tasmota/LWT"
      brightness_command_topic: "cmnd/tasmota/Dimmer"
      brightness_state_topic: "tele/tasmota/STATE"
      brightness_scale: 100
      on_command_type: "brightness"
      brightness_value_template: "{{ value_json.Dimmer }}"
      white_value_state_topic: "tele/tasmota/STATE"
      white_value_command_topic: "cmnd/tasmota/White"
      white_value_scale: 100
      white_value_template: "{{ value_json.White }}"
      rgb_command_topic: "cmnd/tasmota/Color2"
      rgb_state_topic: "tele/tasmota/STATE"
      rgb_value_template: "{{ value_json.Color.split(',')[0:3]|join(',') }}"
      effect_command_topic: "cmnd/tasmota/Scheme"
      effect_state_topic: "tele/tasmota/STATE"
      effect_value_template: "{{value_json.Scheme}}"
      effect_list:
        - 0
        - 1
        - 2
        - 3
        - 4
      payload_on: "ON"
      payload_off: "OFF"
      payload_available: "Online"
      payload_not_available: "Offline"
RGB+CCT Light
Also called RGBWW, RGBCW or 5 channel lights
SetOption17 1 - enables color status in decimals
mqtt:
  light:
    - name: "RGBCCT Light"
      command_topic: "cmnd/tasmota/POWER"
      state_topic: "tele/tasmota/STATE"
      state_value_template: "{{ value_json.POWER }}"
      availability_topic: "tele/tasmota/LWT"
      brightness_command_topic: "cmnd/tasmota/Dimmer"
      brightness_state_topic: "tele/tasmota/STATE"
      brightness_scale: 100
      on_command_type: "brightness"
      brightness_value_template: "{{ value_json.Dimmer }}"
      color_temp_command_topic: "cmnd/tasmota/CT"
      color_temp_state_topic: "tele/tasmota/STATE"
      color_temp_value_template: "{{ value_json.CT }}"
      rgb_command_topic: "cmnd/tasmota/Color2"
      rgb_state_topic: "tele/tasmota/STATE"
      rgb_value_template: "{{ value_json.Color.split(',')[0:3]|join(',') }}"
      effect_command_topic: "cmnd/tasmota/Scheme"
      effect_state_topic: "tele/tasmota/STATE"
      effect_value_template: "{{ value_json.Scheme }}"
      effect_list:
        - 0
        - 1
        - 2
        - 3
        - 4
      payload_on: "ON"
      payload_off: "OFF"
      payload_available: "Online"
      payload_not_available: "Offline"
Addressable LED
Applies only to WS281x lights.
mqtt:
  light:
    - name: "Addressable LED"
      command_topic: "cmnd/tasmota/POWER"
      state_topic: "stat/tasmota/STATE"
      state_value_template: "{{ value_json.POWER }}"
      availability_topic: "tele/tasmota/LWT"
      brightness_command_topic: "cmnd/tasmota/Dimmer"
      brightness_state_topic: "stat/tasmota/STATE"
      brightness_scale: 100
      on_command_type: "brightness"
      brightness_value_template: "{{ value_json.Dimmer }}"
      rgb_command_topic: "cmnd/tasmota/Color2"
      rgb_state_topic: "tele/tasmota/STATE"
      rgb_value_template: "{{ value_json.Color.split(',')[0:3]|join(',') }}"
      effect_command_topic: "cmnd/tasmota/Scheme"
      effect_state_topic: "stat/tasmota/STATE"
      effect_value_template: "{{ value_json.Scheme }}"
      effect_list:
        - 0
        - 1
        - 2
        - 3
        - 4
        - 5
        - 6
        - 7
        - 8
        - 9
        - 10
        - 11
        - 12
      payload_on: "ON"
      payload_off: "OFF"
      payload_available: "Online"
      payload_not_available: "Offline"
      qos: 1
      retain: false
RGB with hex values
If you don't want to use SetOption17 1 with decimal values and use default hex values, change:
rgb_value_template: "{{value_json.Color.split(',')[0:3]|join(',')}}"
  rgb_command_template: "{{ '%02X%02X%02X' | format(red, green, blue)}}"
  rgb_value_template: "{{ (value_json.Color[0:2]|int(base=16),value_json.Color[2:4]|int(base=16),value_json.Color[4:6]|int(base=16)) | join(',')}}"
Control RGB and White independently
Using color picker will keep white light on. If you use the white slider RGB light will get turned off. White value and dimmer value are connected, to have more granular control you will have to split the lights.
Replace
rgb_value_template: "{{value_json.Color.split(',')[0:3]|join(',')}}"
  rgb_command_template: "{{ '%02X%02X%02X=' | format(red, green, blue)}}"
  rgb_value_template: "{{ (value_json.Color[0:2]|int(base=16),value_json.Color[2:4]|int(base=16),value_json.Color[4:6]|int(base=16)) | join(',')}}"
The key is the = after color string in hex. It will retain current white value while changing color.
Using schema: template light
Thorough explanation of template: schema lights and its features on blakadder.com
Sensors~
Add in Home Assistant using the MQTT Sensor integration.
A sensor will send its data in set intervals defined by TelePeriod (default every 5 minutes).
Temperature sensor
Check your sensor name in Tasmota console and change accordingly. This example uses the DHT22 sensor.
mqtt:
  sensor:
    - name: "Tasmota Temperature"
      state_topic: "tele/tasmota/SENSOR"
      value_template: "{{ value_json['DHT22'].Temperature }}"
      unit_of_measurement: "°C"  # "F" if using Fahrenheit
      availability_topic: "tele/tasmota/LWT"
      payload_available: "Online"
      payload_not_available: "Offline"
      device_class: temperature
Humidity sensor
Check your sensor name in Tasmota and change accordingly. This example uses the DHT22 sensor.
mqtt:
  sensor:
    - ame: "Tasmota Humidity"
      state_topic: "tele/tasmota/SENSOR"
      value_template: "{{ value_json['DHT22'].Humidity }}"
      unit_of_measurement: "%"
      availability_topic: "tele/tasmota/LWT"
      payload_available: "Online"
      payload_not_available: "Offline"
      device_class: humidity
Pressure sensor
Check your sensor name in Tasmota and change accordingly. This example uses the BMP280 sensor.
mqtt:
  sensor:
    - name: "Tasmota Pressure"
      state_topic: "tele/tasmota/SENSOR"
      value_template: "{{ value_json.BMP280.Pressure }}"
      unit_of_measurement: "hPa"
      device_class: pressure
"mmHg" if SetOption24 1 Wi-Fi Signal Quality
Monitor the relative Wi-Fi signal quality of a device.
sensor:
  - platform: mqtt
    name: "Tasmota Wi-Fi Quality"
    state_topic: "tele/tasmota/STATE"
    unit_of_measurement: "%"
    value_template: "{{value_json['Wifi'].RSSI }}"
    availability_topic: "tele/tasmota/LWT"
    payload_available: "Online"
    payload_not_available: "Offline"
    device_class: signal_strength
    entity_category: diagnostic # moves the entity to the Diagnostic section on the Device Card
Power Monitoring~
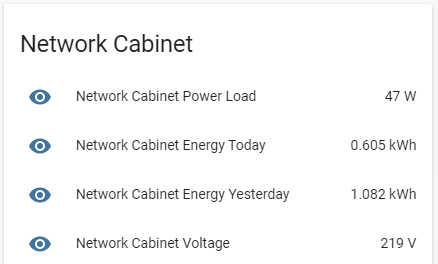
Add in Home Assistant using the MQTT Sensor integration.
Power monitoring sensors will send their data in set intervals defined by TelePeriod (default every 5 minutes).
To get all the data in Home Assistant requires multiple sensors which you can later group to your liking in Lovelace UI
Power Monitoring
mqtt:
  sensor:
    - name: "Energy Today"
      state_topic: "tele/tasmota/SENSOR"
      value_template: '{{ value_json["ENERGY"]["Today"] }}'
      unit_of_measurement: "kWh"
      device_class: energy
      state_class: measurement
    - name: "Power"
      state_topic: "tele/tasmota/SENSOR"
      value_template: '{{ value_json["ENERGY"]["Power"] }}'
      unit_of_measurement: "W"
      device_class: power
      state_class: measurement
    - name: "Voltage"
      state_topic: "tele/tasmota/SENSOR"
      value_template: '{{ value_json["ENERGY"]["Voltage"] }}'
      unit_of_measurement: "V"
      device_class: voltage
      state_class: measurement
    - name: "Current"
      state_topic: "tele/tasmota/SENSOR"
      value_template: '{{ value_json["ENERGY"]["Current"] }}'
      unit_of_measurement: "A"
      device_class: current
      state_class: measurement
Tip
For additional sensors use "Total";"Yesterday";"Period","ApparentPower","ReactivePower";"Factor" in value_template string
Video tutorial on a power monitoring plug setup by Digiblur
Binary Sensors~
Add in Home Assistant using the MQTT Binary Sensor integration.
PIR Sensor
Used for a configured PIR Sensor and requires correct SwitchMode with ON/OFF states and this rule:
Required Commands
Rule1 on Switch1#State=1 do Publish stat/%topic%/MOTION ON endon on Switch1#State=0 do Publish stat/%topic%/MOTION OFF endon
Rule1 1
mqtt:
  binary_sensor:
    - unique_id: motion_sensor
      name: "Tasmota Motion Sensor"
      state_topic: "stat/tasmota/MOTION"
      availability_topic: "tele/tasmota/LWT"
      payload_available: "Online"
      payload_not_available: "Offline"
      device_class: motion
Door Sensor
Requires a reed switch configured in Tasmota. Make sure correct SwitchMode is set
Required Commands
Rule1 on Switch1#State=1 do Publish stat/%topic%/DOOR ON endon on Switch1#State=0 do Publish stat/%topic%/DOOR OFF endon
Rule1 1
mqtt:
  binary_sensor:
    - unique_id: door_sensor
      name: "Tasmota Door Sensor"
      state_topic: "stat/tasmota/GARAGE"
      availability_topic: "tele/tasmota/LWT"
      payload_available: "Online"
      payload_not_available: "Offline"
      device_class: door   # also possible: window, garage_door or opening
RF Bridge
An RF door sensor configured with an RF receiver in Tasmota.
mqtt:
  binary_sensor:
    - platform: mqtt
      name: "RF bridge rfkey"
      payload_on: "1"
      payload_off: "0"
      device_class: opening
      state_topic: "tele/tasmota/RESULT"
      value_template: '{{ value_json.RfReceived.RfKey }}'
Fans~
Add in Home Assistant using the MQTT Fan integration.
Fan
Derived from #2839 by @kbickar and @finity69x2
mqtt:
  fan:
  - unique_id: tasmota_fan
    name: "Tasmota Fan"
    command_topic: "cmnd/tasmota/FanSpeed"
    speed_command_topic: "cmnd/tasmota/FanSpeed"
    state_topic: "stat/tasmota/RESULT"
    speed_state_topic: "stat/tasmota/RESULT"
    state_value_template: >
      {% if value_json.FanSpeed is defined %}
        {% if value_json.FanSpeed == 0 -%}0{%- elif value_json.FanSpeed > 0 -%}4{%- endif %}
      {% else %}
        {% if states.fan.tasmota.state == 'off' -%}0{%- elif states.fan.tasmota.state == 'on' -%}4{%- endif %}
      {% endif %}
    speed_value_template: "{{ value_json.FanSpeed }}"
    availability_topic: tele/tasmota/LWT
    payload_off: "0"
    payload_on: "4"
    payload_low_speed: "1"
    payload_medium_speed: "2"
    payload_high_speed: "3"
    payload_available: "Online"
    payload_not_available: "Offline"
    speeds:
      - "off"
      - "low"
      - "medium"
      - "high"
Covers~
Add in Home Assistant using the MQTT Cover integration.
TuyaMCU Curtain/Shade Motor
Requires SetOption66 1. In this example dpId1 is for open/close/stop of the motor, dpId2 sets position and dpId3 displays the current position.
# Example configuration.yaml entry
mqtt:
  cover:
    - unique_id: tuya_curtain
      name: "Tuya Curtain"
      command_topic: "cmnd/tasmota/TuyaSend4"
      payload_open: "1,0"
      payload_close: "1,2"
      payload_stop: "1,1"
      position_open: 0
      position_closed: 100
      position_topic: "tele/tasmota/RESULT"
      position_template: >-
            {% if value_json.TuyaReceived.DpType2Id3 is defined %}
            {{ value_json.TuyaReceived.DpType2Id3 }}
            {% else %}
            {{ state_attr('cover.tuya_curtain','current_position') | int }}
            {% endif %}
      set_position_topic: "cmnd/tasmota/TuyaSend2"
      set_position_template: '2,{{ position }}'
      availability_topic: "tele/tasmota/LWT"
      payload_available: "Online"
      payload_not_available: "Offline"
If you change name: make sure to reflect that change in the value_template cover name!
Climate~
Detailed guide when using MQTT Climate or Generic Thermostat in Home Assistant
Device Specific~
Covers
For shutter position to persist in Home Assistant through device reboots, execute PowerRetain 1.
These sample configurations should allow the shutter work in Home Assistant. This is only an example and may need further modification to work in your environment.
This example uses a new configuration for roller shutters with options for positioning. It assumes that %prefix%/%topic%/ is configured in the Tasmota Full Topic MQTT parameter.
mqtt:
  cover:
    - name: "Balcony Blinds"
      availability_topic: "tele/%topic%/LWT"
      payload_available: "Online"
      payload_not_available: "Offline"
      position_topic: stat/%topic%/Shutter1
      position_open: 100
      position_closed: 0
      set_position_topic: "cmnd/%topic%/ShutterPosition1"
      command_topic: "cmnd/%topic%/Backlog"
      payload_open: "ShutterOpen1"
      payload_close: "ShutterClose1"
      payload_stop: "ShutterStop1"
      retain: false
      optimistic: false
      qos: 1
Another integration example:
mqtt:
  cover:
    - name: "Test"
      availability_topic: "tele/%topic%/LWT"
      state_topic: "stat/%topic%/RESULT"
      command_topic: "cmnd/%topic%/Backlog"
      value_template: '{{ value | int }}'
      qos: 1
      retain: false
      payload_open: "ShutterOpen1"
      payload_close: "ShutterClose1"
      payload_stop: "ShutterStop1"
      state_open: "ON"
      state_closed: "OFF"
      payload_available: "Online"
      payload_not_available: "Offline"
      optimistic: false
      tilt_command_topic: 'cmnd/%topic%/ShutterPosition1'
      tilt_status_topic: 'cmnd/%topic%/ShutterPosition1'
      set_position_topic: 'cmnd/%topic%/ShutterPosition1'
      position_topic: "stat/%topic%/SHUTTER1"
      tilt_min: 0
      tilt_max: 100
      tilt_closed_value: 0
      tilt_opened_value: 100
mqtt:
  cover:
    - name: "Balcony Blinds"
      availability_topic: "tele/%topic%/LWT"
      payload_available: "Online"
      payload_not_available: "Offline"
      position_topic: "stat/%topic%/RESULT"
      position_template: >
        {% if ('Shutter1' in value_json) and ('Position' in value_json.Shutter1) %}
          {{ value_json.Shutter1.Position }}
        {% else %}
          {% if is_state('cover.balcony_blinds', 'unknown') %}
            50
          {% else %}
            {{ state_attr('cover.balcony_blinds','current_position') }}
          {% endif %}
        {% endif %}
      position_open: 100
      position_closed: 0
      set_position_topic: "cmnd/%topic%/ShutterPosition1"
      command_topic: "cmnd/%topic%/Backlog"
      payload_open: "ShutterOpen1"
      payload_close: "ShutterClose1"
      payload_stop: "ShutterStop1"
In addition, add to your home assistant start up automation a query for the current shutter position:
- alias: "Power state on HA start-up"
  trigger:
    platform: homeassistant
    event: start
  action:
    - service: mqtt.publish
      data:
        topic: "cmnd/%shutters grouptopic%/shutterposition"
        payload: ""
Zigbee Devices~
Warning
The following Zigbee examples assume SetOption83, SetOption89, SetOption100, SetOption112, SetOption118, SetOption119 are all set to 0. Setting any of these to 1 will change topic and/or payload structure from that used in the examples.
Dimmable Light
This configuration is for a dimmable light reporting on 0xE1F9 using endpoint 1, cluster 8 for brightness. ZbRead part in the template is needed to always update the brightness values.
# Example configuration.yaml entry
mqtt:
  light:
    - schema: template
      name: "Fire Light"
      command_topic: "cmnd/zigbee-gateway/Backlog"
      state_topic: "tele/zigbee-gateway/SENSOR"
      command_on_template: >
          {%- if brightness is defined -%}
          ZbSend { "device":"0xE1F9", "send":{"Dimmer":{{ brightness }} } }; ZbSend { "device":"0xE1F9", "send":{"Power":true} }; delay 20; ZbRead { "device":"0xE1F9", "endpoint":1, "cluster":8, "read":0 }
          {%- else -%}
          ZbSend { "device":"0xE1F9", "send":{"Power":true} }; delay 20; ZbRead { "device":"0xE1F9", "endpoint":1, "cluster":8, "read":0 }
          {%- endif -%}
      command_off_template: 'ZbSend { "device":"0xE1F9", "send":{"Power":false} }; delay 20; ZbRead { "device":"0xE1F9", "endpoint":1, "cluster":8, "read":0 }'
      state_template: >
          {% if value_json.ZbReceived is defined and value_json.ZbReceived['0xE1F9'] is defined and value_json.ZbReceived['0xE1F9'].Power is defined %}
          {% if value_json.ZbReceived['0xE1F9'].Power == true %}
          on
          {% else %}
          off
          {% endif %}
          {% else %}
          {{ states('light.fire_light') }}
          {% endif %}
      brightness_template: >
          {%- if value_json.ZbReceived is defined and value_json.ZbReceived['0xE1F9'] is defined and value_json.ZbReceived['0xE1F9'].Dimmer is defined -%}
          {{ value_json['ZbReceived']['0xE1F9'].Dimmer | int }}
          {%- else -%}
          {{ state_attr('light.fire_light', 'brightness') | int }}
          {%- endif -%}
Water Leak Sensor
This specific configuration is for Xiaomi Aqara Water Leak sensor reporting on 0x099F.
# Example configuration.yaml entry
mqtt:
  binary_sensor:
    - name: "Water Leak"
      state_topic: "tele/zigbee-gateway/SENSOR"
      value_template: >
        {%- if value_json.ZbReceived is defined and value_json.ZbReceived['0x099F'] is defined -%}
        {%- if value_json.ZbReceived['0x099F']['0500!00'] == '010000FF0000' -%}
        ON
        {% else %}
        OFF
        {% endif %}
        {% else %}
        {{ states('binary_sensor.water_leak') }}
        {% endif %}
      availability_topic: "tele/zigbee-gateway/LWT"
      payload_available: "Online"
      payload_not_available: "Offline"
      device_class: moisture
Enable join button
mqtt:
  button:
    - unique_id: z2t_enable_join
      name: "Zigbee2Tasmota enable join"
      command_topic: "cmnd/zigbee-gateway/ZbPermitJoin"
      payload_press: "1"
      availability_topic: "tele/zigbee-gateway/LWT"
      payload_available: "Online"
      payload_not_available: "Offline"
      entity_category: "default"
      device_class: "restart"
Useful Automations~
Extended device information
Wi-Fi signal quality can be added as a parameter to any previous configuration by appending this section to the existing configuration yaml
    json_attributes_topic: "tele/tasmota/STATE"
    json_attributes_template: "{{ value_json.Wifi | tojson }}"
Sync Power State
When MQTT broker or Home Assistant is restarted, or there is a WiFi outage, Tasmota device states may not be synced with Home Assistant. Use this automation to keep your devices in sync, including power state, immediately after Home Assistant is started.
automation:
  - id: Sync Tasmota states
    alias: Sync Tasmota states
    initial_state: true
    trigger:
      platform: homeassistant
      event: start
    action:
    # sync state for devices with default fulltopics
    - service: mqtt.publish
      data:
        topic: cmnd/tasmotas/state
        payload: ''
    # sync state for pre8.2 autodiscovery devices
    - service: mqtt.publish
      data:
        topic: tasmotas/cmnd/state
        payload: ''
To sync a single TuyaMCU device states add this block with your %topic% to the automation. !!! bug You could use tasmotas but SerialSend might cause issues on other devices so proceed with caution.
    - service: mqtt.publish
      data:
        topic: cmnd/%topic%/serialsend5
        payload: 55aa0001000000
Sync Zigbee device states. Add this block with your %topic% and your Zigbee device name, endpoint and cluster.
Example for a dimmable light
    - service: mqtt.publish
      data:
        topic: cmnd/zigbee-gateway/Backlog
        payload: ZbRead { "device":"0xE1F9", "endpoint":1, "cluster":6, "read":0 }; delay 5; ZbRead { "device":"0xE1F9", "endpoint":1, "cluster":8, "read":0 }
Report Firmware Version
Add a sensor like below for each Tasmota device whose firmware version you want to track.
mqtt:
  sensor:
    - platform: mqtt
      name: "Tasmota"
      state_topic: "stat/tasmota/STATUS2"
      value_template: "{{value_json['StatusFWR'].Version }}"
      availability_topic: "tele/tasmota/LWT"
      payload_available: "Online"
      payload_not_available: "Offline"
Automation to have each device report firmware version on Home Assistant reboot. You can manually trigger this automation from Home Assistant UI.
automation:
  - alias: "Tasmota Firmware Version Check"
    trigger:
      platform: homeassistant
      event: start
    action:
      - service: mqtt.publish
        data:
          topic: "cmnd/tasmotas/STATUS"
          payload: "2"
Tip
If you want all your devices to switch to autodiscovery method go through Developer tools - MQTT by publishing to grouptopic cmnd/tasmotas/SetOption19 with payload 1
Get most recent Tasmota firmware version number from github
mqtt:
  sensor:
    - platform: command_line
      name: "Tasmota (latest version)"
      command: 'curl -s https://api.github.com/repos/arendst/Tasmota/tags | grep "name" | sort --version-sort -r | head -n 1 | sed -E "s/\s*\"name\": \"(.*)\",*/\1/g"'
      scan_interval: 86400 # check once every day

MQTT Discovery REMOVED~
Home Assistant MQTT Discovery is removed from all builds of Tasmota and development of this feature is halted!
Home Assistant has a feature called MQTT discovery. With MQTT discovery no user interaction or configuration file editing is needed to add new devices in Home Assistant. Most of the changes will be updated in HA automatically.
Enable Autodiscovery~
Enable autodiscovery on a device with the command:
SetOption19 1
After the automatic discovery feature is enabled a retained MQTT message starting with topic "homeassistant/" is sent to the broker. That message contains your device configuration which will be picked up and used by Home Assistant to automatically add your device to MQTT integrations.
Tasmota uses DeviceName to identify the device in Home Assistant MQTT integration and FriendlyName<x> to identify power outputs (switch or light entities in HA).
When changing some settings you might need a reboot or use SetOption19 1 again to see the new changes under Home Assistant.
Special settings for each device type:
Finalising Setup~
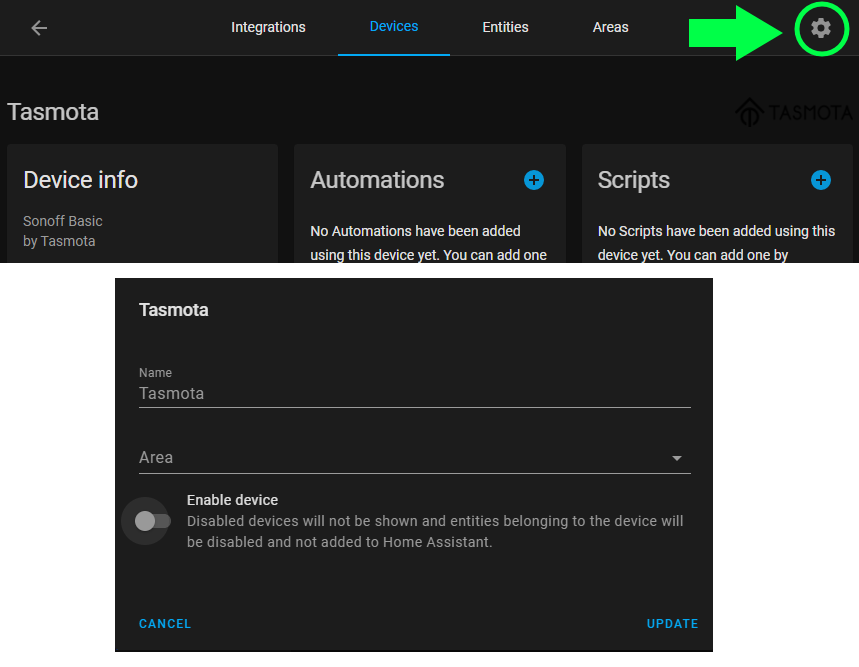
All automatically discovered entities will show up under Configuration -> Integrations -> MQTT card.
The entities are grouped under a device defined by DeviceName and identified by Tasmota as the "manufacturer": 
Overview of a Tasmota device in Home Assistant integration compared to Configuration -> Configure Other:
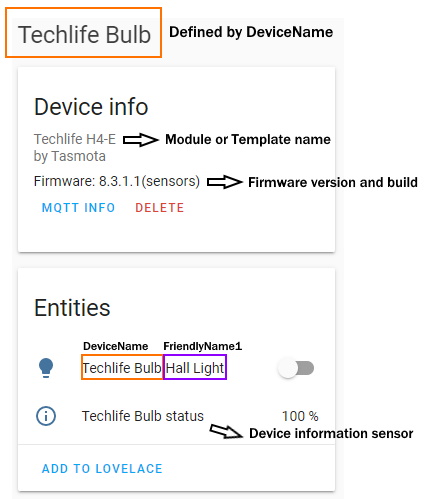
For every device an informative sensor will be created automatically:
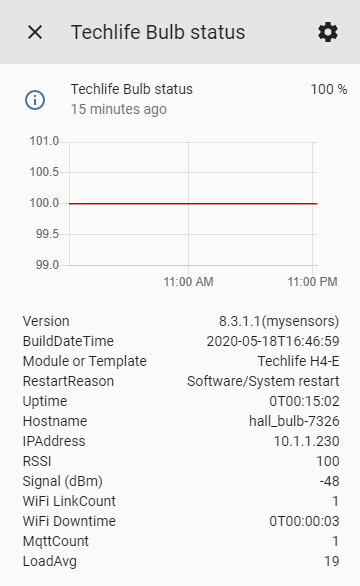
This sensor will update on TelePeriod which is 5 minutes by default
It will show as "Unavailable" until the first TelePeriod MQTT message
You can further customise your device in Home Assistant by clicking on the entity name.
Enabling discovery will automatically change some SetOptions to suit the new configuration
SetOption4 to 0: Return MQTT response always as RESULT and not as %COMMAND% topic
SetOption17 to 1: Show Color as a comma-separated decimal string instead of hexadecimal
SetOption59 to 1: Send tele/%topic%/STATE in addition to stat/%topic%/RESULT for commands State, Power and any command causing a light to be turned on.
Supported Entities~
Announced to Home Assistant as Automation Trigger.
To have buttons discovered SetOption73 must be set to 1 and it will automatically start to listen and publish using /stat/%topic%/BUTTON<x>T topic.
Discovery will follow all the possible combinations made using SetOption1, SetOption11 and Setoption13.
Announced to Home Assistant as MQTT Light.
Discovery supports single channel Dimmer as well as multi-channel RGB, RGBW, RGBCCT and CCT lights.
To have multi-channel PWM instead of a single light entity under Home Assistant use SetOption68 1.
If you have a light with 4 or 5 channels (RGB+W or RGB+CCT) you can split them into two separate lights, first one for RGB and second for White/CT.
Note
Tasmota will no longer switch %prefix% and %topic% and will keep the default topic structure. This could lead to a very long topic for a light and autodiscovery could fail to parse the necessary code for Home Assistant. In this case a warning will be shown in the logs and Tasmota Console. To avoid this issue keep your Topic and/or FriendlyName as short as possible.
Alternatively you can configure it manually using Light integration.
Warning
Pay attention to the order of the relays when used in conjunction with lights. The relays have priority over the lights, an incorrect order could lead to an erroneous light control. Add them starting from relay1. Entities for relays and lights will not be available in Home Assistant until the configuration will be updated.
Announced to Home Assistant as MQTT Switch.
To make a relay discovered as "light" in Home Assistant use command SetOption30 1
Alternatively you can configure it manually using Light Switch integration.
Warning
Pay attention to the order of the relays when used in conjunction with lights. The relays have priority over the lights, an incorrect order could lead to an erroneous light control. Add them starting from relay1. Entities for relays and lights will not be available in Home Assistant until the configuration will be updated.
Announced to Home Assistant as MQTT Sensor.
When discovery is enabled Tasmota will send all the sensors information to Home Assistant. For each sensor present, entities will be created in numbers equal to the items present below him.
Example:
An AM2301 sensor will generate one entity for Temperature, one for Humidity and one for Dew point.
Warning
Please be advised that not all sensors can be correctly rendered under Home Assistant. In those cases a fallback function will be used to create a generic sensor and the correct operation is not guaranteed.
Announced to Home Assistant as MQTT Binary Sensor and/or as an Automation Trigger.
To have switches discovered SwitchTopic must be set to a custom name and it will automatically start to listen and publish using stat/%topic%/SWITCH<x> (binary sensor) or stat/%topic%/SWITCH<x>T (trigger) topics.
Depending by the SwitchModeused, a switch can be a Trigger (TOGGLEor HOLD), a Binary Sensor (ON/OFF) or both at the same time.
Example:
When using with SwitchMode 0 Tasmota will create just one Trigger for TOGGLE.
When using with SwitchMode 1 Tasmota will create a Binary Sensor with ON and OFF Payloads.
When using with Switchmode 5 Tasmota will create a Binary Sensor with ON and OFF Payloads and a Trigger for TOGGLE.
All switchmodes are supported with the sole exception of SwitchMode11 and SwitchMode12 able to generate just a TOGGLE trigger.
When a switch is set to a different topic than 0 is not possible to use Switch#State as a trigger for rules.
Types of devices not listed above (covers, etc) require manual configuration
Troubleshooting~
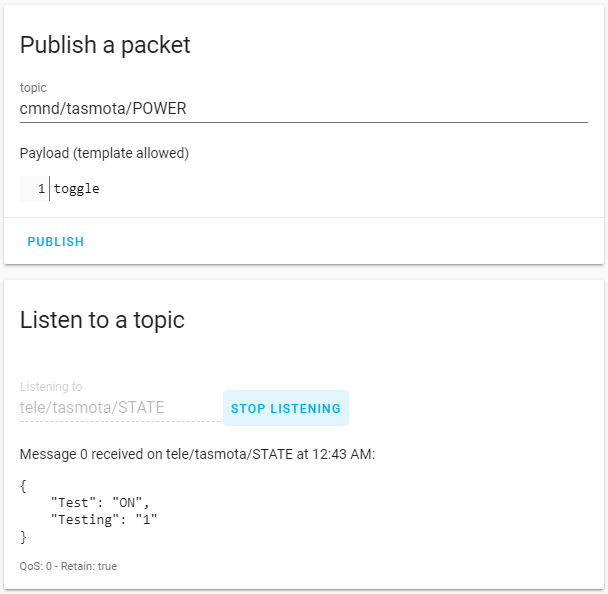
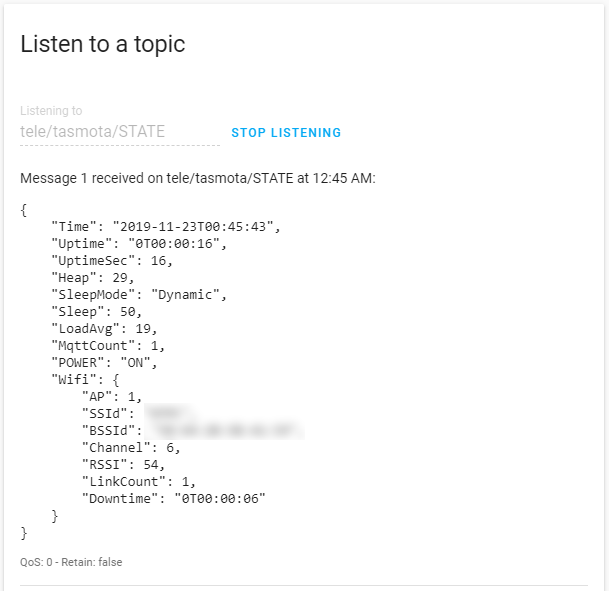
Test if Tasmota and Home Assistant can communicate properly.

Click on the above button or in your Home Assistant web UI go to Configuration - Integrations, locate MQTT card and click on CONFIGURE. Subscribe to tele/%topic%/STATE and click START LISTENING. You should see a JSON response from your device inside 5 minutes.
To test control of a relay or light, as Publish a packet topic enter cmnd/%topic%/POWER with payload toggle or 2. When you click PUBLISH your device should switch state and a JSON resc