MQTT
MQTT is the main protocol for controlling Tasmota devices
After you have a working MQTT broker you need to configure Tasmota to communicate with it. If you have no knowledge of what MQTT is, you can learn about it from MQTT Essentials articles.
Warning~
All ESP32 devices (including all varaiants like ESP32c<x> and ESP32s<x>) natively support encrypted MQTT over TLS. ESP8266 do not natively support TLS unless you compile your own variant with TLS support. Unencrypted MQTT should be limited to own LAN, external unencrypted communication is a very serious security flaw, your device can become a malware bot!
Configure MQTT~
If you flashed a precompiled .bin or didn't enter MQTT info in user_config_override.h before compiling you have to configure it on your device first.
Configure MQTT using WebUI~
Go to Configuration -> Configure Other and make sure "MQTT Enable" box is checked.
Once MQTT is enabled you need to set it up using Configuration -> Configure MQTT.
Tip
While here, you might as well change the Friendly Name into something more descriptive than generic "Tasmota".
This is highly recommended for Home Assistant autodiscovery feature.

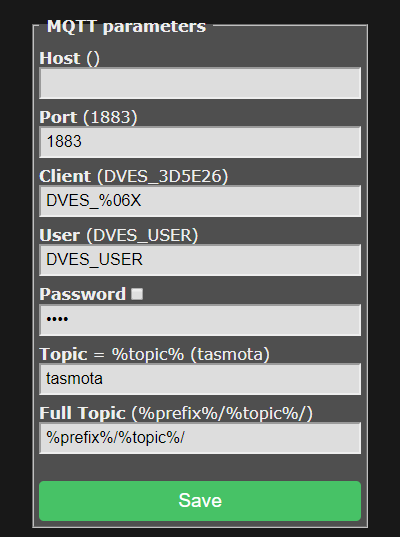
For a basic setup you only need to set Host, User and Password but it is recommended to change Topic to avoid issues. Each device should have a unique Topic.
- Host = your MQTT broker address or IP (mDNS is not available in the official Tasmota builds, means no
.localdomain!) - Port = your MQTT broker port (default port is set to 1883)
- Client = device's unique identifier. In 99% of cases it's okay to leave it as is, however some Cloud-based MQTT brokers require a ClientID connected to your account. Can not be identical to Topic!
- User = username for authenticating on your MQTT broker
- Password = password for authenticating on your MQTT broker
- Topic = unique identifying topic for your device (e.g.
hallswitch,kitchen-light).%topic%in wiki references to this. It is recommended to use a single word for the topic. - FullTopic = full topic definition. Modify it if you want to use multi-level topics for your devices, for example
lights/%prefix%/%topic%/or%prefix%/top_floor/bathroom/%topic%/etc.
Configure MQTT using Backlog~
Using a serial connection or the WebUI Console you can issue (or even better, paste a premade) Backlog command for quick and easy MQTT setup.
Backlog mqtthost <mqtt_broker_address>; mqttport <mqtt_broker_port>; mqttuser <username>; mqttpassword <password>; topic <device_topic>
After a reboot all necessary MQTT settings are configured. Don't forget, you can use Backlog for all commands!
Commands over MQTT~
To send commands and view responses you'll need an MQTT client.
Commands over MQTT are issued to Tasmota by using topic cmnd/%topic%/<command> and payload <parameter>. If there is no <parameter> (an empty MQTT message/payload), a query is sent for current status of the <command>.
Tip
If you are using mosquitto_pub command-line tool, you can issue an empty payload using the -n command line option. If your MQTT client cannot issue an empty payload, you can use the single character ? instead.
Command flow~
The following example will go in depth on what happens when you send an MQTT command.
A device was flashed and configured with the FullTopic as default %prefix%/%topic%/ and the Topic set to tasmota_switch. We want to see the current status of the switch and change it.
By looking at the commands table we can learn about the POWER command and options associated with it.
Ask the device for status~
cmnd/tasmota_switch/Power ←     // an empty message/payload sends a status query
    ↳ stat/tasmota_switch/RESULT → {"POWER":"OFF"}
    ↳ stat/tasmota_switch/POWER → OFF
Send a command to toggle the relay~
cmnd/tasmota_switch/Power TOGGLE
    ↳ // Power for relay 1 is toggled
    ↳ stat/tasmota_switch/RESULT → {"POWER":"ON"}
    ↳ stat/tasmota_switch/POWER → ON
Tip
By default, Tasmota replies to all commands through .../RESULT. This behavior can be changed using SetOption4, which makes the commands reply on the endpoint matching the command name, ex. cmnd/tasmota/PowerOnState will send a response on stat/tasmota/POWERONSTATE.
Examples~
In the following examples %topic% is tasmota, FullTopic is %prefix%/%topic%/, and prefixes are default cmnd/stat/tele:
-
The relay can be controlled with
cmnd/tasmota/POWER on,cmnd/tasmota/POWER offorcmnd/tasmota/POWER toggle. Tasmota will send a MQTT status message likestat/tasmota/POWER ON. -
Power state message can be sent with the retain flag set using
PowerRetain 1. -
Telemetry messages can also be sent with the retain flag using
SensorRetain. -
For Sonoff Dual or Sonoff 4CH the relays need to be addressed with
cmnd/tasmota/POWER<x>, where {x} is the relay number from 1 to 2 (Sonoff Dual) or from 1 to 4 (Sonoff 4CH).cmnd/tasmota/POWER4 offturns off the 4th relay on a Sonoff 4CH. -
MQTT topic can be changed with
cmnd/tasmota/Topic tasmota1which reboots Tasmota and changes the%topic%totasmota1. From that point on MQTT commands should look likecmnd/tasmota1/POWER on. -
The OTA firmware location can be made known to tasmota with
cmnd/tasmota/OtaUrl http://ota.tasmota.com/tasmota/release/tasmota.bin. Reset to default withcmnd/tasmota/OtaUrl 1. -
Upgrade OTA firmware from the OtaUrl server with
cmnd/tasmota/Upgrade 1. -
Show all status information with
cmnd/tasmota/Status 0. -
The button can send a MQTT message to the broker that in turn will switch the relay. To configure this you need to perform
cmnd/tasmota/ButtonTopic tasmotawhere tasmota equals to Topic. The message can also be provided with the retain flag bycmnd/tasmota/ButtonRetain on. -
Sonoff Pow (and any device with sensors) status can be requested manually with
cmnd/tasmota/status 8. Additionally, Tasmota periodically sends telemetry every TelePeriod, which defaults to 300 seconds (5 minutes). -
When a Sonoff Pow (and any device with power metering sensors) threshold like PowerLow has been met a message
tele/tasmota/POWER_LOW ONwill be sent. When the error is corrected a messagetele/tasmota/POWER_LOW OFFwill be sent.
While most MQTT commands will result in a message in JSON format the power status feedback will always be returned like stat/tasmota/POWER ON as well.
Telemetry data will be sent by prefix tele like tele/tasmota/SENSOR {"Time":"2017-02-16T10:13:52", "DS18B20":{"Temperature":20.6}}
MQTT Topic Definition~
FullTopic~
This is the MQTT topic used to communicate with Tasmota over MQTT. It is created using tokens placed within a user definable string (100 character limit). The tokens are substituted dynamically at run-time. Available substitution tokens are:
%prefix%= one of three prefixes as defined by commandsPrefix1(default =cmnd),Prefix2(default =stat) andPrefix3(default =tele).%topic%= one of five topics as defined by commandsTopic,GroupTopic,ButtonTopic,SwitchTopicandMqttClient.%hostname%= the hostname of the device as defined through the web UI (default =%s-%04d) or viaHostnamecommand.%id%= MAC address of the device.
Tip
These substitution tokens will be used in examples across the documentation
If FullTopic does not contain the %topic% token, the device will not subscribe to GroupTopic and FallbackTopic.
Tip
The order of %prefix% and %topic% doesn't matter, unless you have enabled Auto-discovery for Home Assistant (SetOption19). Enabling this option re-formats the FullTopic to required order.
Using the tokens the following example topics can be made:
FullTopic %prefix%/%topic%/defaultFullTopic tasmota/%topic%/%prefix%/FullTopic tasmota/bedroom/%topic%/%prefix%/FullTopic penthouse/bedroom1/bathroom2/%topic%/%prefix%/FullTopic %prefix%/home/cellar/%topic%/
%prefix%~
Tasmota uses 3 prefixes for forming a FullTopic:
cmnd- prefix to issue commands; ask for statusstat- reports back status or configuration messagetele- reports telemetry info at specified intervals
Warning
To solve possible MQTT topic loops it is strongly suggested that you use the %prefix% token in all of your FullTopics. Status and telemetry do not need a prefix.
%topic%~
All MQTT status messages will be sent using the configurable %topic% which must be made unique by the user. It can be called bedroom but it could also be called XP-TS_10 as long as the user knows what it is and where to find it.
Default Topic is tasmota_XXXXXX where XXXXXX is unique and derives from the last 6 characters of the MAC address
The use of the %topic% token is mandatory in case you want to use ButtonTopic and/or SwitchTopic. It also provides for GroupTopic and Fallback Topic functionality.
Tip
Use %prefix% and %topic% tokens at all time within your FullTopic definition!
GroupTopic~
Having two devices with the same topic allowed for MQTT commands to be sent once to make the devices act in conjunction. That inspired a third topic called GroupTopic. Devices with the same GroupTopic will all listen to that GroupTopic and react to the same MQTT command sent to it. You can use this to take global actions like updating firmware on all devices or split up devices into different groups using a unique GroupTopic for each group.
Default GroupTopic is tasmotas
FallBack Topic~
Initially Tasmota had one MQTT configurable topic planned called Topic. It soon became apparent that when two devices come online with the same topic this would be a challenge, to say the least!
Tasmota then introduced a unique, non-configurable "FallBack Topic" that allows MQTT communication regardless of the configurable topic. This fallback topic is just what it is meant to be: a fallback topic in case of emergency!
By default the Fallback Topic is DVES_XXXXXX_fb where xxxxxx is derived from the last 6 characters of the device's MAC address (excluding :). It might look something like this: DVES_3D5E26_fb. You can find out the DVES code by looking at Information page in the webUI or issuing Status 6:
12:36:17 MQT: stat/tasmota/STATUS6 = {"StatusMQT":{"MqttHost":"1.1.1.1","MqttPort":1883,"MqttClientMask":"DVES_%06X","MqttClient":"DVES_3D5E26","MqttUser":"tasmota","MqttCount":1,"MAX_PACKET_SIZE":1000,"KEEPALIVE":30}}
LWT Topic (Last Will and Testament)~
On connection to the MQTT broker tasmota uses the Last Will and Testament (LWT) feature that instructs the broker to generate a notification about an ungracefully disconnect or timeout.
The topic to listen to for the state of this specific client is tele/<TOPIC>/LWT that with the mosquitto MQTT broker produces an output like:
$ mosquitto_sub -t "tele/tasmota_XXXXXX/LWT"
Offline
Online
The full LWT topic can be found in the tasmota console at boot:
15:51:51.281 MQT: tele/tasmota_XXXXXX/LWT = Online (retained)
Retained MQTT Messages~
If MQTT is defined and retain option is used the last state will be stored permanently in MQTT database.
| Command | Description |
|---|---|
InfoRetain | Show current MQTT info retain state.0 / off = disable MQTT info retain (default) 1 / on = enable MQTT info retain |
PowerRetain | Show current MQTT power retain state. 0 / off = disable MQTT power retain on status update (default) 1 / on = enable MQTT power retain on status update |
SensorRetain | Show current MQTT sensor retain state.0 / off = disable MQTT sensor retain on sensor update (default) 1 / on = enable MQTT sensor retain on sensor update |
StateRetain | Show current MQTT state retain state.0 / off = disable MQTT state retain (default) 1 / on = enable MQTT state retain |
StatusRetain | Show current MQTT status retain state.0 / off = disable MQTT status retain (default) 1 / on = enable MQTT status retain |
SwitchRetain | Show current MQTT switch retain state.0 / off = disable MQTT switch retain on switch update (default) 1 / on = enable MQTT switch retain on switch update |
BUT, a power message in your MQTT broker flagged as 'retained' will always override the PowerOnState.
This is usually the main cause for "ghost switching". Learn more in MQTT retained messages explained. Check out this tutorial for troubleshooting switch ghosting.
Clearing Retained Messages~
To check, if there is a retain flag set for the switch's power topic, monitor cmnd/+/power in a MQTT client (recommended MQTT.fx for Windows or Eclipse Mosquitto in linux).
You can use Tasmota Device Manager to clear all retained messages for selected device with a single click.

or use the following tutorials/forum threads:
- Clearing retained messages with mosquitto
- Remove retained messages in Home Assistant
- Remove retained messages in hass.io MQTT addon
Subscribe/Unsubscribe~
This feature is not included in precompiled binaries
To use it you must compile your build. Add the following to user_config_override.h:
#ifndef SUPPORT_MQTT_EVENT
#define SUPPORT_MQTT_EVENT
#endif
user_config_override.h: #ifdef RULE_MAX_MQTT_EVENTSZ
#undef RULE_MAX_MQTT_EVENTSZ
#endif
#define RULE_MAX_MQTT_EVENTSZ 512
Subscribe~
Subscribes to an MQTT topic and assigns an Event name to it.
Subscribe <eventName>, <mqttTopic> [, <key>]
The <key> parameter is specified when you need to parse a key/value pair from a JSON payload in the MQTT message. In order to parse a value from a multi-level JSON pair, you can use one dot (.) syntax to split the key into sections.
You subscribe to an MQTT topic and assign an event name. Once the subscribed MQTT message is received the configured event will be triggered.
Command without any parameters will list all currently subscribed topics.
Domoticz Users
As designed, domoticz/out (or any user defined DOMOTICZ_OUT_TOPIC) overrules the rule subscribe functionality in a way that you're unable to subscribe to domoticz/out/1234/#. This means that you can't subscribe to this topic, unless you remove all Domoticz relay/idx relations with command DzIdx0 0 or if you had disabled the USE_DOMOTICZ flag when compiling your own firmware.
You can set up a rule with ON EVENT#<event_name> DO ... ENDON to do what you want based on this MQTT message. The payload is passed as a parameter once the event has been triggered. If the payload is in JSON format, you are able to get the value of specified key as a parameter.
For example, if you have a Tasmota based thermostat and multiple temperature sensors in different locations, usually you have to set up a home automation system like Domoticz to control the thermostat. Right now, with this new feature, you can write a rule to do this.
Examples~
Rule1
  ON mqtt#connected DO Subscribe BkLight, stat/other-device-topic/POWER ENDON
  ON Event#BkLight=ON DO <command> ENDON
Rule1
  ON mqtt#connected DO Subscribe DnTemp, tele/other-device-topic/SENSOR, DS18B20.Temperature ENDON
  ON Event#DnTemp>=21 DO <command> ENDON
{"Time":"2017-02-16T10:13:52", "DS18B20":{"Temperature":20.6}} Rule1
ON mqtt#connected DO Subscribe DnTemp, tele/other-device-topic/SENSOR, DS18B20.Temperature ENDON
ON Event#DnTemp DO TempMeasuredSet %value% ENDON
Unsubscribe~
Unsubscribe from topics which were subscribed to using the Subscribe command.
Unsubscribe from a specific MQTT topic
Unsubscribe <eventName>
The command without a parameter will unsubscribe from all currently subscribed topics.
Return codes (rc)~
Sometimes, something wrong can happen and you might need to check return codes.
A return code can be found in the console, example output for Return Code = 5 : MQT: Connect failed to xxxx:1883, rc 5. Retry in 10 sec
Below table provides more information about it. The original values are related to PubSubClient.h constants.
| Code | Constant name | Description |
|---|---|---|
| -5 | MQTT_DNS_DISCONNECTED | the DNS server cannot be reached or name cannot be resolved |
| -4 | MQTT_CONNECTION_TIMEOUT | the server didn't respond within the keepalive time |
| -3 | MQTT_CONNECTION_LOST | the network connection was broken |
| -2 | MQTT_CONNECT_FAILED | the network connection failed |
| -1 | MQTT_DISCONNECTED | the client is disconnected cleanly |
| 0 | MQTT_CONNECTED | the client is connected |
| 1 | MQTT_CONNECT_BAD_PROTOCOL | the server doesn't support the requested version of MQTT |
| 2 | MQTT_CONNECT_BAD_CLIENT_ID | the server rejected the client identifier |
| 3 | MQTT_CONNECT_UNAVAILABLE | the server was unable to accept the connection |
| 4 | MQTT_CONNECT_BAD_CREDENTIALS | the username/password were rejected |
| 5 | MQTT_CONNECT_UNAUTHORIZED | the client was not authorized to connect |