TensorFlow Lite ~
This feature is not included in precompiled binaries
add as a build flag to your build environment in platformio_tasmota_cenv.ini:
build_flags             = ${env:tasmota32_base.build_flags}
                        -DUSE_BERRY_TF_LITE
                        -DESP_NN ; use optimized kernels for ESP32/ESP32-S3
                        -DUSE_I2S_ALL ; add only for speech/microphone use
lib_extra_dirs          = lib/libesp32, lib/libesp32_div, lib/lib_basic, lib/lib_i2c, lib/lib_div, lib/lib_ssl, lib/libesp32_ml
; lib/libesp32_ml is important to include
Currently supported targets: ESP32 and ESP32-S3.
Different Levels of TensorFlow~
TensorFlow is an open-source machine-learning platform that is widely adopted and thus is a whole ecosystem with tools, libraries and a huge community. It is not application specific and can be used for all kind of tasks.
Initially it was only usable on fully fledged computers but over time technical advances in software and hardware made it possible to step down the stairs and make it usable on weaker devices.
So the next smaller thing is called TensorFlow Lite that was targeted for smaller devices like the famous ARM-based 'RaspberryPi'.
But - you guessed it - this was not the end of the line and the whole armada of microcontrollers reached out to be part of the machine learning world. The name of this stripped down platform is TensorFlow Lite for Microcontrollers.
Tasmota uses a fork from Espressif with optimized functions for maximal performance.
Machine Learning ... is what exactly again?~
Machine learning, deep learning, KI, AI, ... - these are very blurry defined words, that mean more or less the same and scale from pretty complex up to extremely complex software constructs. Let's try to have a very simplified look at it.
In ancient times (like 20 years ago) problems where solved on computers by finding an algorithm to compute input data and thus getting output data.
With machine learning the process is still to have input data, but to use known good output data to let a piece of software find the algorithm to get from the known input data to the known output data - and hope that this still works with unknown input data.
The mixture of algorithms and found parameters will be put into a structure which is called a model and the process of building it is usually named training.
The model is created programmatically, although this process can be hidden behind a GUI and at this stage the number of inputs and outputs will be defined.
Although it would be technically possible to feed raw sensor data into the model, this is not how it is done in most cases. The very common step in between is called feature extraction, which reduces the amount of data and often the dimensionality to make the whole process more efficient and thus even possible for some applications. A good feature extraction will help to later run a successful inference and there are tools to show, how different input entities form clusters of feature data.
After feeding the model with sensible data it is time to press a virtual "go button" and invoke an inference, that does the magic computations inside the model.
After that the outputs will get populated with some values, that have to be interpreted as probabilities. It can be required to add some complex logic in order interpret this data or do some averaging of real-time data.
The processed data is historically typically in the floating point format, but for weak devices like MCU's it is a very common thing to shrink the 4 bytes of a float32 to 1 byte of an int8 by quantization. This happens on various places and will lead to a loss of precision, but is very often nearly on par in the final result.
Design Considerations for Tasmota~
The understandable way to optimize machine learning applications for MCU's is to build and later flash one monolithic firmware, where everything has to be done at/before compile time. This makes sense and is fundamentally the only way to quench out every little bit of performance and memory optimization.
Nonetheless for Tasmota we do not really want to build one-trick-pony firmwares and the idea is to be able to run all kinds of TensorFlow applications with one firmware, that has enough generic capabilities to dynamically load models and extra code at runtime. On the other hand we can optimize the program flow for the ESP chips and Free-RTOS.
The API shall be quite slim with as few boilerplate code as possible, but can be extended as needed and use Berry to add additional logic in the first place.
Accelerate your development workflow for machine learning
Usually developing machine learning applications on MCU's means that every small change to the model and/or application code will need a firmware compilation and flashing.
With Tasmota this is now independent to each other. You can retrain and reupload the model to the file system as often as needed at runtime. The same is valid for refining the Berry code.
In order to get things done like speech recognition, where especially realtime feature extraction is not possible to achieve with Berry (with the knowledge of today), additional specialized functionality is included.
Before you proceed, check you expectations!!
The most important prerequisite for speech recognition on MCU's is to have the right mindset. It is totally impossible to reach the level of recognition of a commercial product (Alexa, Siri, Cortana, ... you name it) on much stronger hardware. The usual cheap I2S MEMS microphone alone is a severe problem and the tuning of the various variables of the model is trial and error in many cases. It will make the final application fail with wrong but similar sounding words or mumbling.
Be happy if it works and just don't do it, if you can not handle frustration! You will have to invest some time to fine tune every specific application!
This sums up to these steps:
-
Create a TensorFlow lite model (including collecting data, finding good parameters, final training). Use Edgeimpulse to make this easy or create your own training pipeline.
-
Create a Berry application (loading the model, running inference, interpret the result, acting on the result). Use building blocks from this page to get started.
Speech Recognition~
For the specific task of speech recognition a big hurdle lies in the way in the form of "How to create a model"?. Although there are numerous ways published on various places, that sound quite similar to each other, this is a very non-trivial task.
While the same principles apply to all examples that you may find, the implementation differences under the hood are quite substantial.
The hardest part here is to do the feature extraction of the audio data in a compatible(!!!) way for training and inference on the device. Usually the raw audio data is processed using mel frequency conversion, FFT and some kind of logarithm. You may find words like power spectrum, mel frequency energies and mel frequency cepstral coefficients, which sadly are very implementation specific and not interchangeable.
So it is utterly important to use the same (= compatible) implementations for the whole pipeline of Training->Deployment->Usage.
For convenience reasons and after extended testing it was decided to be compatible with Speechpy (with small differences). Thus it is possible to use Edge Impulse as the training platform for model creation, which uses Speechpy too and is a development platform for machine learning on small devices, that shares some similarities to GitHub with regards to costs. Everything that we need for Tasmota is free, the enterprise solution they offer for money is not needed.
Technically it is definitely possible to build a complete offline training pipeline as basically everything on Edgeimpulse is open source and can be recreated by a motivated user for local usage.
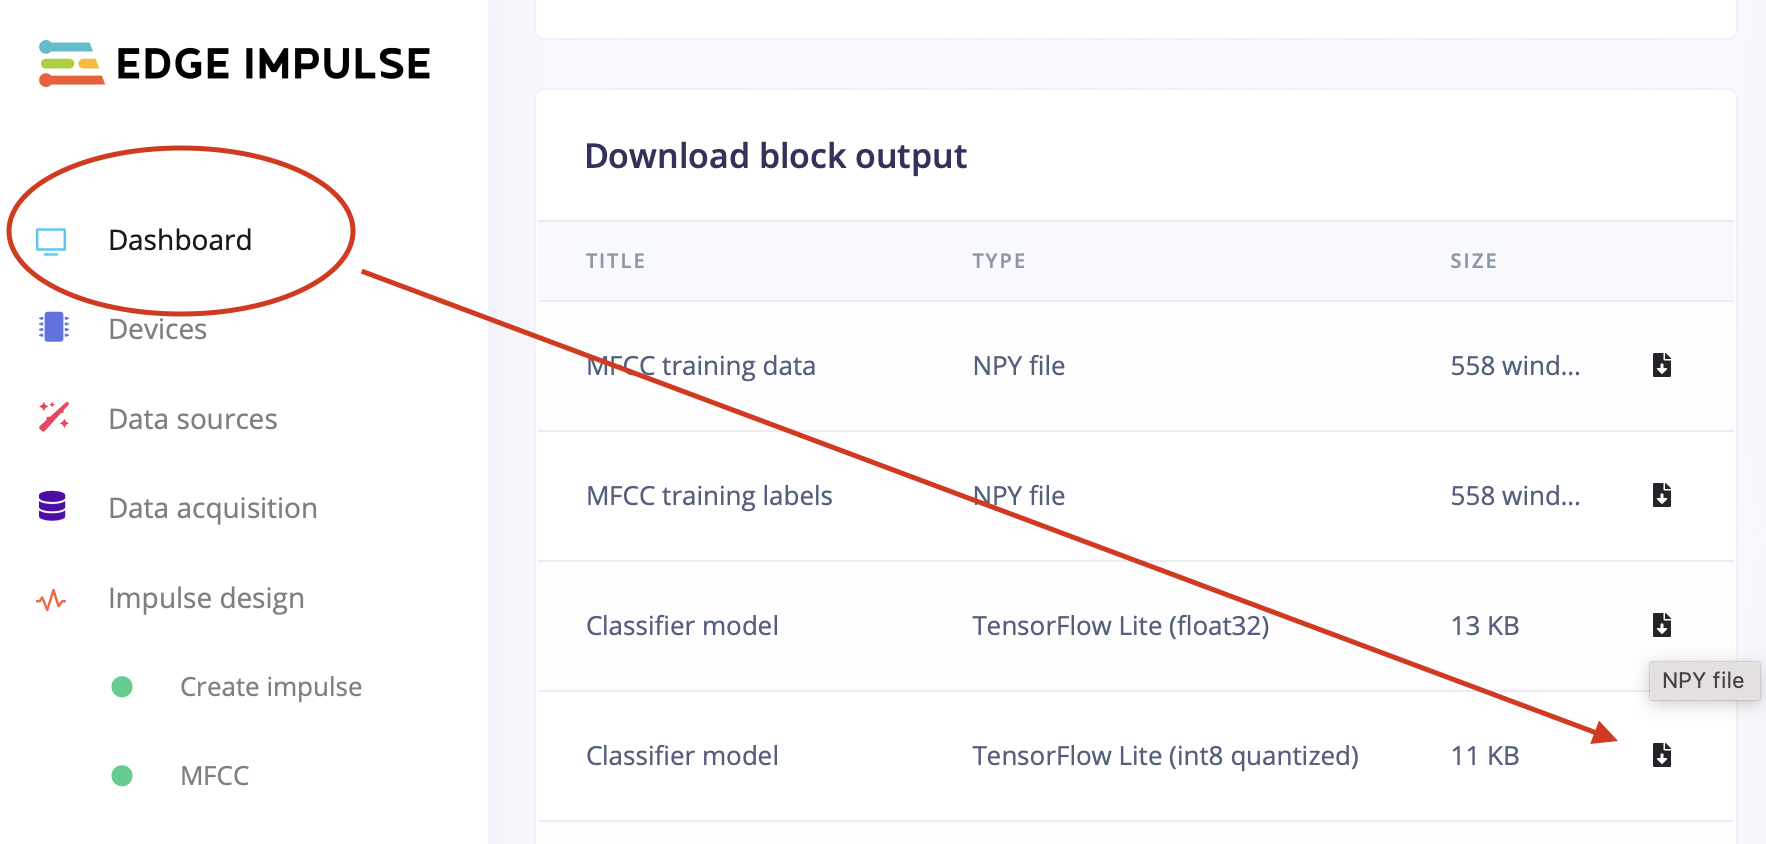
If you use Edge Impulse for online training, you do not have to create a new firmware image for your Tasmota device. Instead of choosing one of the deployment options from Edge Impulse, you only have to download the binary TensorFlow Lite model (usually the int8 quantized version) from the Dashboard, give it a suitable name and upload it to Tasmotas filesystem in order to use it with Berry afterwards.
Usage~
Functionality is provided by the module TFL, so always start with import TFL.
Use Netron to check your model
https://netron.app shows the inner structure of a tensorflow model including format and size of the inputs and outputs. Online and offline versions of the application available for every major platform.
"Hello World" Sort Of...~
Perhaps THE starter project is the in itself pretty useless "sinewave example", which is nicely explained in these videos.
Of course we can run this model perfectly fine inside Tasmota, with a Berry code snippet:
import TFL
TFL.begin("BUF")  # generic TFL session
var i = bytes(-4) # holds one float, size must match the model
var o = bytes(-4) # dito

var model = open("sine_model.tflite").readbytes() # this binary file must have been saved in the FS before
TFL.load(model,o,3000) # load and run

var count = 0.0
def cb()
    if TFL.output(o)
        # "draw" a bar
        var v =  int((o.getfloat(0) + 1) * 15)
        var bar_el = "="
        var bar = ""
        for i:0..v bar+=bar_el end
        print(bar)

        # or print the value
        # print(o.getfloat(0))

        # prepare new input in the range of 0..6
        count+= 0.1
        if count>6 count=0 end
        i.setfloat(0,count)
        TFL.input(i) # and feed it into the model
    end
    var s = TFL.log() # receive log messages from the TF lite tasks
    if s print(s) end
    tasmota.set_timer(50, cb)
end
cb()

# initiate loop
TFL.input(i)
This will pollute your Tasmota console with a moving bar resembling a sine wave.
In fact this shows a very generic application, where the format and size as well as the meaning of the in- and outputs must be known, but the model itself can remain a "black box". We do not need to know, which kernels or parameters are used.
Use 'TFL.stats()' to find memory size
The metrics will show the used bytes of the model. So start with a large value and tune down, but leave a margin above the number in the output of the command.
Speech Recognition / Keyword Spotting~
Training can be done entirely with Edgeimpulse. See their documentation for Responding to your voice.
It is important to have a basic understanding of the process of speech recognition in order to set and tune the configuration:
An audio stream is processed in small slices, which have a duration and a stride. They can overlap or run one after the other.
Tasmota will process every audio slice and immediately extract the features with support for the modes: MFE and MFCC.
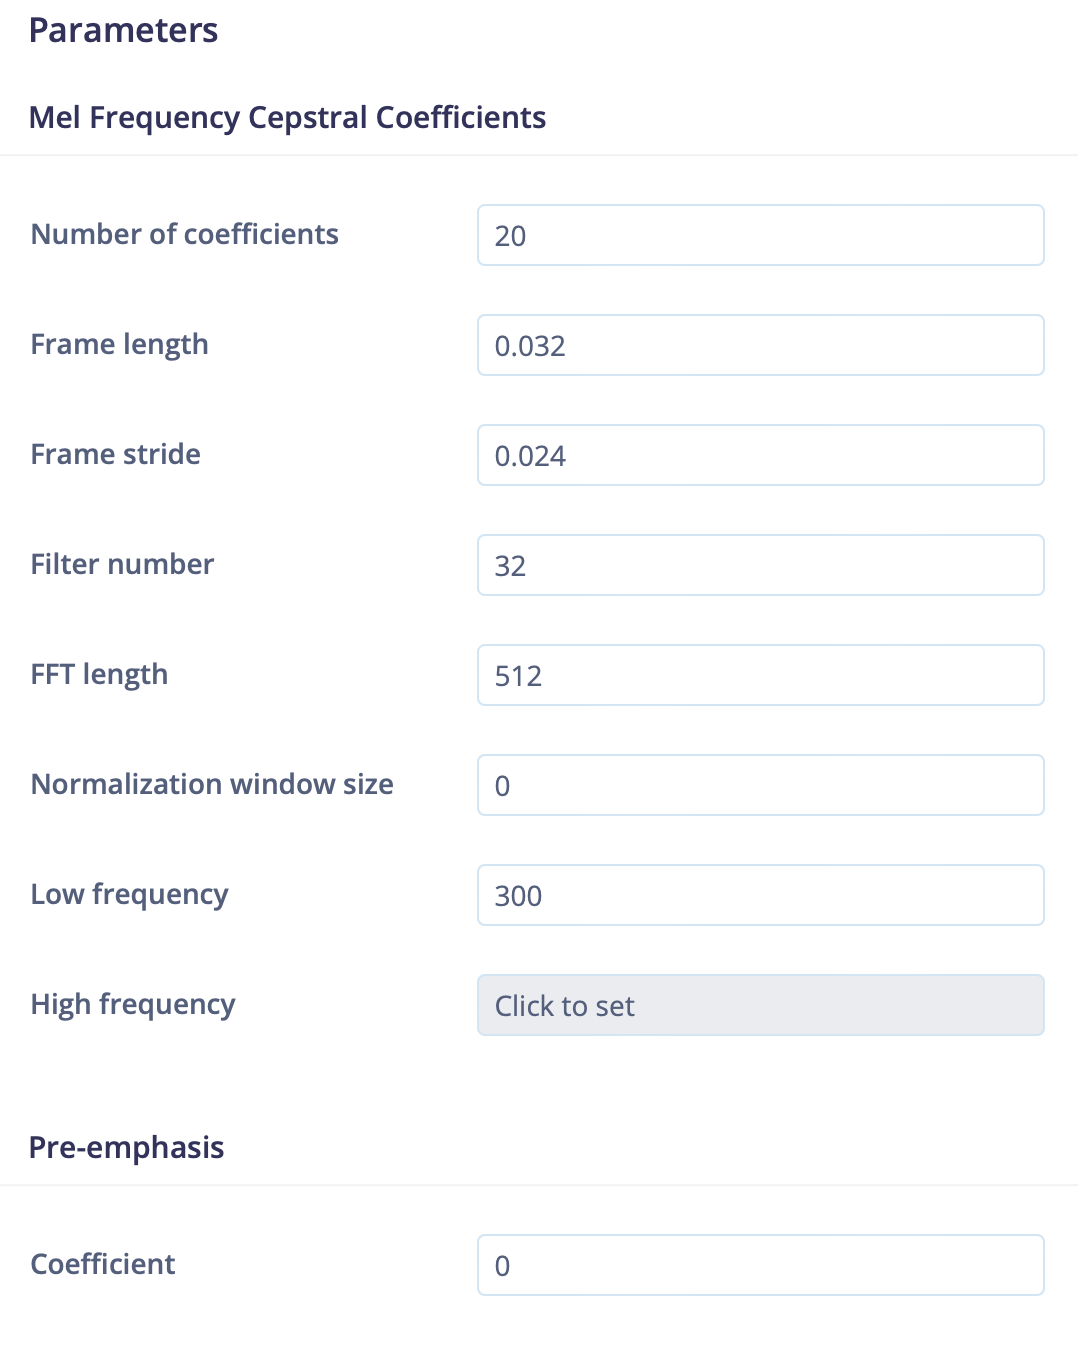
For performance reasons, we do not support every setting Edgeimpulse provides. Do not use Window size for MFCC mode by setting it to 0. More on this later.
We use the following fixed audio settings:
| Setting | Value |
|---|---|
| Sample length | 1 second - means the word to train should be shorter (you might get away with training a shorter part of a longer word) |
| Sample frequency | 16kHz - a proven compromise of sound quality, that is just enough for voice recognition, but can be handled by the ESP32 |
| Sample format | 16 bit, mono |
| Low frequency | 300 Hz - default in Edgeimpulse |
| High frequency | 8000 Hz - Sample frequency/2 and default too. Higher values would not make sense because of the NYQUIST theorem. |
Create Training Data~
A working microphone setup for recording training data and later audio recognition is needed. We reuse the setup of the I2S driver of Tasmota, that must be configured according to I2S-Audio for ESP32.
Currently supported are 16 bits per sample at a rate of 16000 Hz. This can be set with:
i2sconfig {"Rx":{"SampleRate":16000}}
i2sconfig {"Rx":{"Gain":30}}
Although you can use the microphone of your computer or smartphone, it is highly recommended to use your ESP32 microphone at least for a large amount of samples in order to train the model with the same pure sound quality, that it later has to run inference on. A working SD card config is the best way to capture training data.
You can use a simple Berry driver from Tasmotas example collection to get this done:
wavrec.be
Usage:
waverec5 /test - > record 5 seconds to /test.wav
Then you can talk into the microphone with around 1 word per second and later upload this file to your Edge Impulse project via your computer.
General strategies~
- Mix input samples from different microphones. Using the computer or phone for audio recording is way more user friendly, so add some samples the easy way. But without enough samples from your ESP32 microphone the final performance will be mediocre at best.
- Input samples from different speakers will very likely lead to a more robust model. So ask family and friends for help.
- More is more. Almost always adding more samples will result in a better performing model. Don't give up, if testing performance degrades in the early stages of audio harvesting. Just make sure to only add valid audio data with correct labels and the final result will improve with more audio data.
Edge Impulse~
For training on Edge Impulse some post processing is usually necessary.
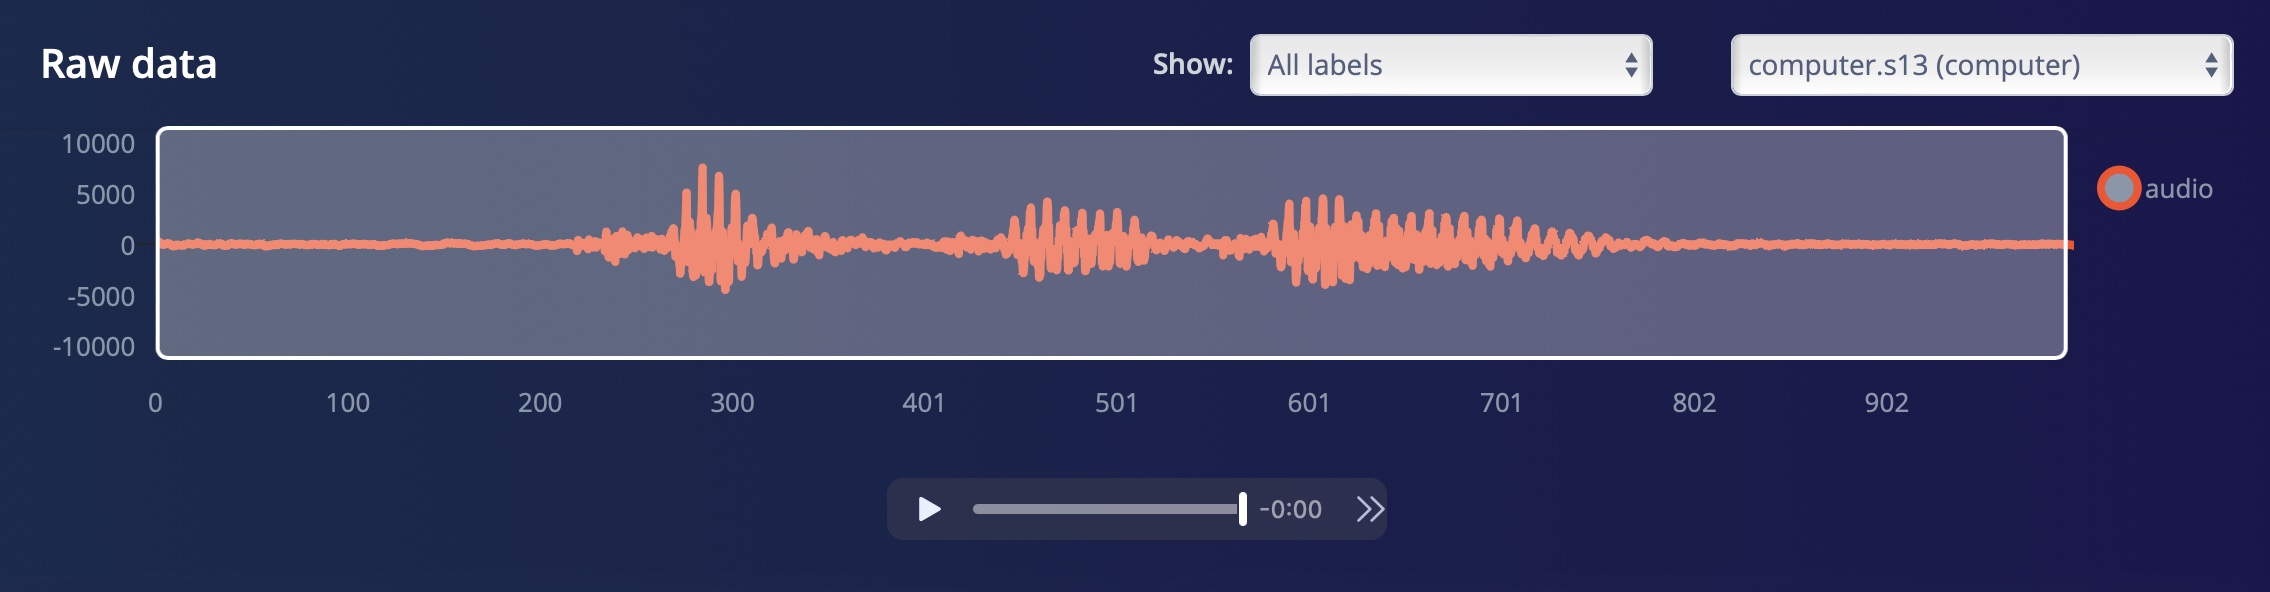
If you have uploaded a sample containing many repetitions of one word, there is a convenient split function, that slices the long mega-sample into one-second samples. For very short words this works automatically pretty well, for longer words close to one second it is recommended to check and fix possible errors immediately.
You can check the resulting simple sample including the correct label:
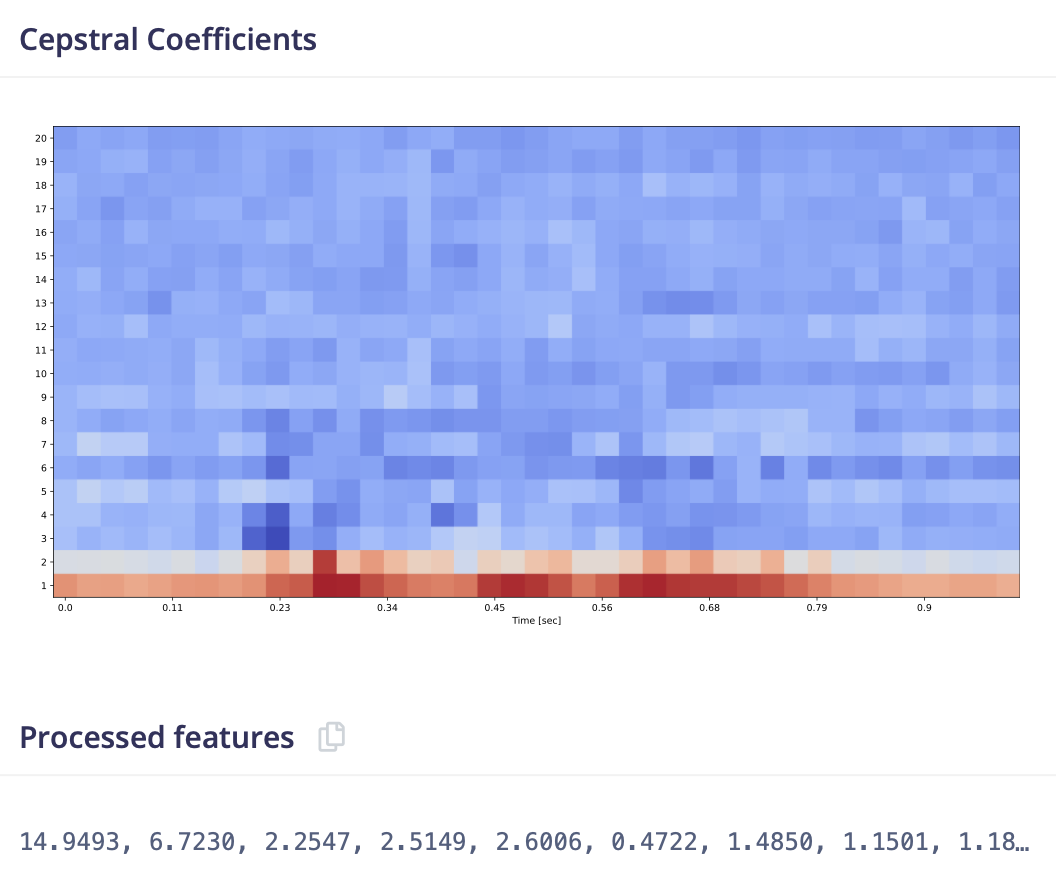
The feature extraction step needs some parameters and will happen in the same way before training and later on-device.
This will create a feature array, which will stack the features of every slice on each other. This will be visualized as a heat map, where a slice is a column (oldest left) and the lines represent the frequency banks. Thus this "picture" holds the data of one second of audio, that the ML model will later "see" to do inference.
Configuring the neural network architecture can be done in a GUI. Following the rule to go deep (more layers) and not too wide (less neurons) results in smaller models.
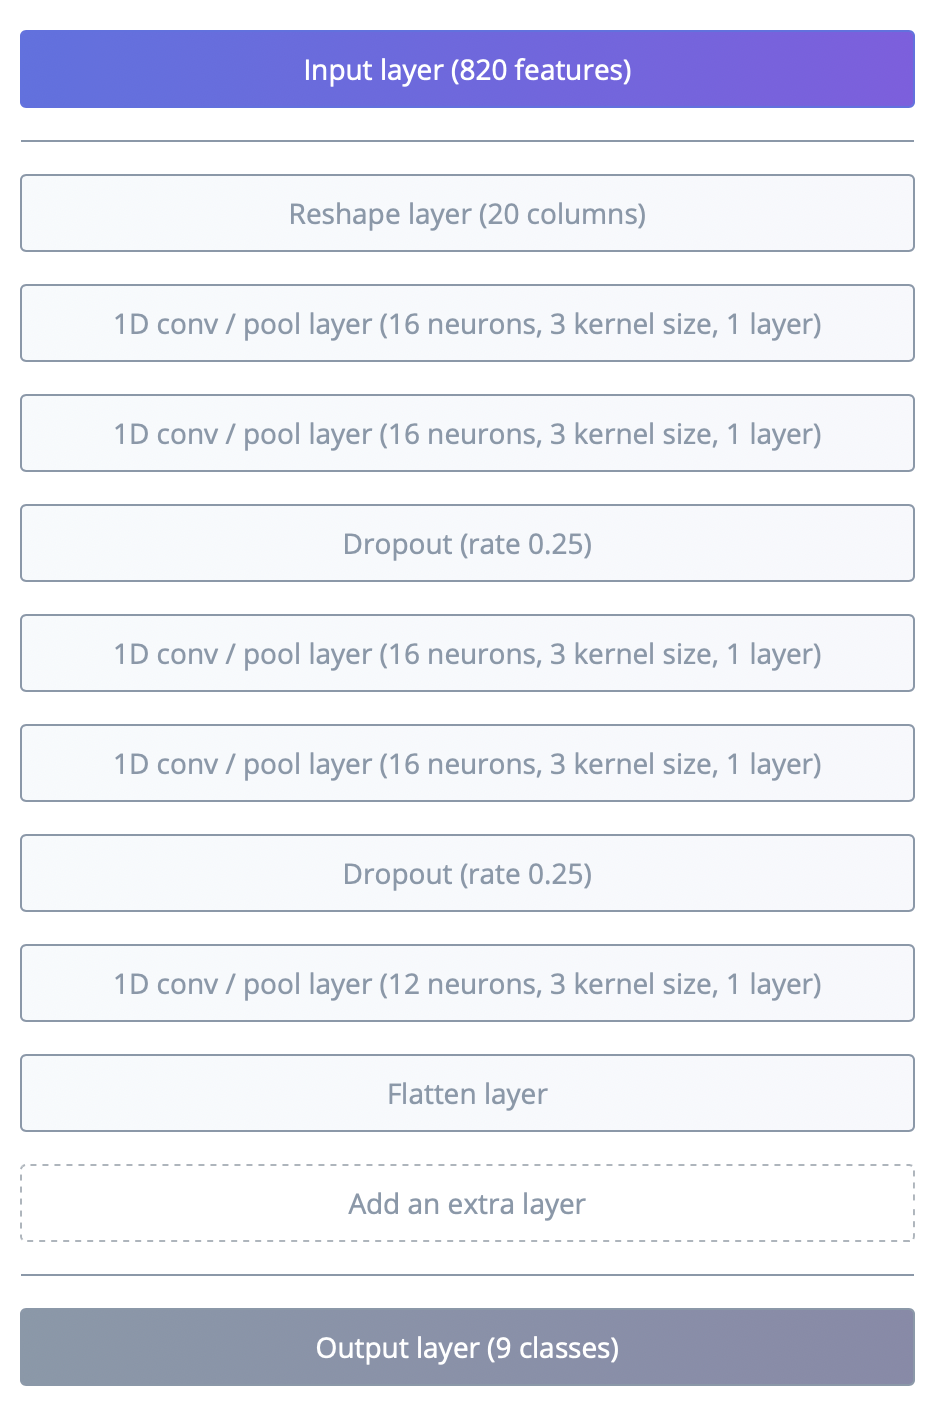
After training and configuring the model on Edgeimpulse we can simply download the TensorFlow Lite model from the dashboard (the int8 version) and upload it to the ESP32 filesystem.
Tasmota Side~
On the Tasmota side the feature settings have to be translated in Berry with a descriptor. The descriptor settings may change in the future!
| number | property | value |
|---|---|---|
| 0 | i2s_channel_fmt_t | this is an old setting and ignored now, maybe used differently in the future |
| 1 | amplification factor | this is an old setting and ignored now, maybe used differently in the future |
| 2 | slice duration or Frame length | A slice of audio data in milliseconds. With the fixed audio settings 32 milliseconds translate to 512 samples, which as a power of 2 is a good fit for FFT. |
| 3 | slice stride or Frame stride | Time in milliseconds between the starts of 2 adjacent slices. No overlap happens if duration and stride are equal. Lower values create more stress for the system. Values around and below 20 milliseconds may leads to problems. Bad Wifi will worsen things earlier!! |
| 4 | Filter number | Number of captured mel energies. For MFE mode these are the feature values for one slice. |
| 5 | MFCC coefficients or Number of coefficients | If not 0, this means we use MFCC mode and these are the feature values for one slice. |
| 6 | FFT size or FFT length | In powers of 2. For now must be equal or greater than sample size, means slice duration of 32 ms -> sample size 512 -> 2^9 -> 9 |
| 7 | Inferences per second | Typical values 4-10. More values need more averaging in post-processing, but will likely show less missed words. |
| 8 | Noisefloor | In dB for MFE mode. Sound data with level below that threshold will be discarded. |
| 9 | preemphassis | Factor will be divided by 100, so 98 -> 0.98. It is recommended to not use this, as Edgeimpulse and Speechpy compute this over the whole sample, while Tasmota does this per slice, which is way more efficient but creates a difference. There is a way to overcome this. More later ... |
The Berry driver for the speech recognition must be adapted for every model and use case. A plain old ESP32 without extra PS-RAM is enough to "hear" with about 10 inferences per per second.
Demo example:
# globals
var key_words = ["down", "left", "noise", "right", "up"] # must match your trained model!! Edgeimpulse sorts them alphabetically
var thresholds = [700,710,680,680,720] # same indices as key_words, increase against false positives, decrease against misses,
                                       # max. theoretical value = 256 * number of averages for int8_t output tensor

class PREDICTOR
    var avgs, sz, time_out
    var out_buf, out_buf_idx

    def init(sz, averages)
        self.out_buf = bytes(-(averages * sz)) # creates circular buffer for averaging
        self.out_buf_idx = 0
        self.time_out = 0 # after successful word finding, make a break to avoid "noise findings"
        self.sz = sz # size of word list/output tensor
        self.avgs = averages # number of averaging/oversampling steps
    end

    def clear() # clear oversampling buffer after word was found
        for i:0..size(self.out_buf)-1
            self.out_buf[i] = 0
        end
    end

    def run(data)
        if self.time_out > 0
            self.time_out -= 1
            return 255 # return some error code = no result
        end

        for i:0..(self.sz-1)
            self.out_buf[self.out_buf_idx+i] = data[i]
        end
        self.out_buf_idx += self.sz
        if self.out_buf_idx>(self.avgs-1) * self.sz
            self.out_buf_idx = 0
        end

        var average
        for i:0..(self.sz-1)
            average = 0
            for j:0..self.avgs-1
                average +=  self.out_buf[i+(j*self.sz)]
            end
            # if i == 4
            #     print(average) # test the threshold for single words while developing, needed in the next step
            # end
            if average > thresholds[i] # find the threshold stored in the global list by trial and error
                if i != 2 # this is the non-noise/unknown output - you must infer this from your model
                    self.clear() # only clear the buffer after finding a keyword, not for noise/unknown
                    self.time_out = 10 # find the value by trial and error - good starting point is one second
                                       # lower number allows faster speech, but might increase false positives
                    print(average)
                end
                return i
            end
        end
        return 255 # return some error code = no result
    end
end

class MICROSPEECH : Driver
    var o, o_sz  # output tensor, size of output tensor
    var p        # predictor instance
    var model    # this var really holds the model data for the entire session
    var new_out  # current output sensor converted to uint8_t

    def init()
        import TFL
        self.o_sz = size(key_words) # this value must be correctly taken from the model/training pipeline
        self.new_out = []
        self.new_out.resize(self.o_sz)
        self.o = bytes(-self.o_sz) # size must match the model
        self.p = PREDICTOR(self.o_sz,4) # second arg is number of averages for prediction

        var descriptor = bytes(-10)
        descriptor[0] = 4  # ignored
        descriptor[1] = 16 # ignored
        descriptor[2] = 32 # slice_dur in ms
        descriptor[3] = 32 # slice_stride in ms
        descriptor[4] = 26 # mfe filter (= features if MFE mode)
        descriptor[5] = 13 # mfcc coefficients, if 0 -> compute MFE only
        descriptor[6] = 9  # 2^9 = 512 fft_bins
        descriptor[7] = 10 # max. invocations per second - find best value by testing on device
        descriptor[8] = 52 # db noisefloor -> negative value
        descriptor[9] = 0 # preemphasis
        TFL.begin("MIC",descriptor)
        self.model = open("mfcc.lite").readbytes() # file must be present on the ESP
        if self.model
            TFL.load(self.model,self.o,28000)
        end
    end

    def every_50ms()
        import TFL
        if TFL.output(self.o)
            for i:0..(self.o_sz-1)
                self.new_out[i] = self.o.geti(i,1) + 128
            end
            #print(self.new_out)
            var r = self.p.run(self.new_out)
            if r != 2 && r != 255 # in this example not noise/unknown/error code - can be more complex
                print(key_words[r])
                # do something useful
            end
        end
        var s = TFL.log()
        if s print(s) end
    end
end

var mic = MICROSPEECH()

tasmota.add_driver(mic)
Image classification~
This is really a huge task for any ESP32 and needs some "treatment" to make life as easy as possible for this tiny and weak platform. Do not expect easy success.
As other projects have shown before it is important to create an optimal photo capture setup, which typically involves 3D printed housing.
Excellent and extensive information can be found here: AI-on-the-edge-device
In Tasmota we use a generic and flexible approach, which does not use a special mode of the TFL module.
The biggest chunk of work goes into model creation and the hardware setup. Once this is solved, running inference on the ESP with a Berry script should not be a showstopper.
ML-learning by doing~
Let's walk through a simple example step by step.
The object to observe has a very common 7-segment display, which could show any type of data, but here it is just a clock.
Camera setup~
First step is to create the capture setup. If we would change this later, most of the next step will need to be done again. As the main problem of any ESP is the lack of memory, it is important to use the lowest camera resolution, that get's the job done. Orthographic projection wil produce the least artifacts, so we try to come as close to this as possible.
ROI creation~
Now we must create definitions of regions of interest for every digit, that will be used later in the Berry script. This can be done with the help of a web tool right here in the docs: ROI editor
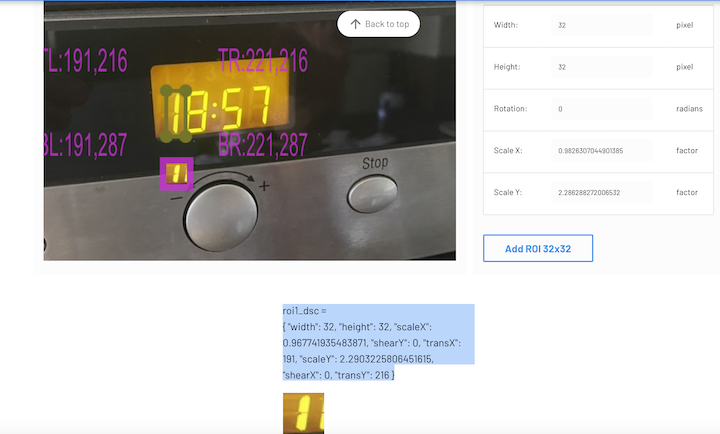
You can select-copy-paste the matrix definition for later use as it is already valid Berry code. The ROI pictures can be saved (with chrome based browser) to be used in the training process later.
After we have a feasible construction, we can think about the model.
Model training~
A ready made model "from somewhere" is the fastest option, but here we create one from scratch.
To train it, we typically need thousands of photos. This would be a pretty insane task to shoot by hand. That's why the demo model was created with the help of synthetic image creation, which includes a so called "image augmentation". This means the creation of multiple slight abbreviations of one source image, which typically involves scaling, shearing, blurring, noise addition, contrast variation and in this case image inversion. Very likely we must add some original pictures from the observed display, which we can get from the ROI editor.
Again we use Edgeimpulse to finally create the model. The demo project can be found here:
7-segment
Here we can see the uploaded images and model design - similar to the speech recognition example from above.
From the dashboard we can download the final model file with the type TensorFlow Lite (int8 quantized) which is about 17 KB in size.
Berry implementation~
Finally we must put it all together. We need the model binary file and write the Berry script to use it.
For demo purposes the following script can run inference on the demo image from the docs: dt.jpg, which must be uploaded to the ESP.
Download the model, name it 7d.lite and upload it too.
Now save the Berry script as digits.be and start with br load("digits") from the normal console or with load("digits") from the Berry console.
class ROI_DSC
    var _dsc

    def init()
        self._dsc = []
        var d1 = { "width": 32, "height": 32, "scaleX": 1, "shearY": 0, "transX": 189, "scaleY": 2.5161290322580645, "shearX": 0, "transY": 213 }
        self._dsc.push(self.roi_dsc(d1))
        var d2 = { "width": 32, "height": 32, "scaleX": 1.4193548387096775, "shearY": 0, "transX": 215, "scaleY": 2.5161290322580645, "shearX": 0, "transY": 210 }
        self._dsc.push(self.roi_dsc(d2))
        var d3 = { "width": 32, "height": 32, "scaleX": 1.4193548387096775, "shearY": 0, "transX": 269, "scaleY": 2.5161290322580645, "shearX": 0, "transY": 205 }
        self._dsc.push(self.roi_dsc(d3))
        var d4 = { "width": 32, "height": 32, "scaleX": 1.4193548387096775, "shearY": 0, "transX": 315, "scaleY": 2.5161290322580645, "shearX": 0, "transY": 200 }
        self._dsc.push(self.roi_dsc(d4))
    end

    def get(idx)
        if idx > (size(self._dsc) - 1)
            return nil
        end
        return self._dsc[idx]
    end

    def roi_dsc(m)
        var d = bytes(-24)
        d.setfloat(0,m["scaleX"])
        d.setfloat(4,m["shearX"])
        d.setfloat(8,m["shearY"])
        d.setfloat(12,m["scaleY"])
        d.seti(16,m["transX"],2)
        d.seti(18,m["transY"],2)
        d.seti(20,m["width"],2)
        d.seti(22,m["height"],2)
        return d
    end
end

class DIGITS : Driver
    var out, model
    var cam_img
    var dsc
    var result, idx, idx_step, need_input


    def init()
        self.initTFL()
        self.cam_img = img()
        self.dsc = ROI_DSC()
        self.result = [-1,-1,-1,-1]
        self.idx = 0
        self.idx_step = 0
        self.need_input = true

        self.initCam()
        self.initFromFile() # for the demo
        # self.updateImg() # really take picture from cam
        tasmota.add_driver(self)
    end

    def stop()
        self.tasmota.remove_driver(self)
    end

    def initCam()
        import cam
        cam.setup(8) # 640 * 480
    end

    def initFromFile() # utility method for demo testing/debugging
        var f = open("/dt.jpg","r")
        var b = f.readbytes()
        f.close()
        self.cam_img.from_jpg(b,img.GRAYSCALE)
        b = nil
        tasmota.gc()
    end

    def updateImg()
        import cam
        cam.get_image(self.cam_img,img.GRAYSCALE)
    end

    def initTFL()
        import TFL
        TFL.begin("BUF")  # generic TFL session
        self.out = bytes(-10) # one output for every digit
        self.model = open("/7d.lite").readbytes() # this binary file must have been saved in the FS before
        TFL.load(self.model,self.out,20000) # load and run, find value for memory allocation by trial and error
    end

    def handle_inference()
        import mqtt
        var digit = self.predict()
        if digit == nil
            self.result[self.idx] = -1
            # mqtt.publish("tele/display",format('{"time":"error"}'))
        else
            self.result[self.idx] = digit
        end
        self.idx += 1
        if self.idx == size(self.result) # full run over 4 digits complete
            self.idx = 0

            # self.updateImg() # now we might take the next picture

            log(f"Complete result: {self.result[0]}{self.result[1]}:{self.result[2]}{self.result[3]}") # or mqtt publish
            # mqtt.publish("tele/clock",format('{"time":"%i%i:%i%i"}',self.result[0],self.result[1],self.result[2],self.result[3]))
        end
        log(f"DIG: result of inference: {digit} for {self.idx}",3)
        self.need_input = true
    end

    def update_input()
        import TFL
        var next_dsc = self.dsc.get(self.idx)
        var roi = self.cam_img.get_buffer(next_dsc)
        if TFL.input(roi, true)
            self.need_input = false
        end
    end

    def every_100ms() # not aiming at
        import TFL
        if self.need_input
            self.update_input()
        elif TFL.output(self.out)
            self.handle_inference()
        end
        var log_msg = TFL.log() # receive log messages from the TF lite tasks
        if log_msg log(f"TFL: {log_msg}",3) end
    end

    def predict()
        # very simple implementation
        var max_val = -128
        var threshold = 0 # find out empirically
        var digit = nil
        for idx : 0..(size(self.out)-1)
            var score = self.out.geti(idx,1)
            if max_val < score
                if score > threshold
                    digit = idx
                end
                max_val = score
            end
        end
        return digit
    end
end

digits = DIGITS()
This will print the clock string to the console and can be used as a starting point for real world use cases.