WS2812B and WS2813
WS2813B versus WS2812B~
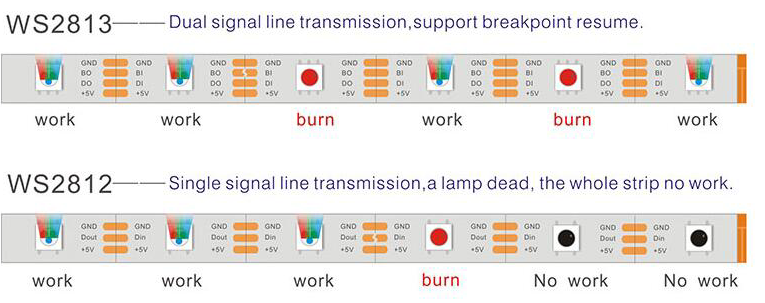
The newer version of ws2812b is the ws2813b, which has dual signal lines to prevent a led failure also consecutive leds fail.

ESP8266 needs Level shifting - WS281x schematic~
Below the schematics to connect an ESP82xx to a WS281x.

About this circuit diagram and the oscilloscope traces~
Channel 1 (yellow) is connected to an output of the ESP8266 Chip, and therefore shows the input voltage of the level shifting circuit.
Channel 2 (green) is connected to the output of the level shifting circuit, and therefore shows the input voltage to the first WS281X pixel.
How does the MOSFET circuit work and what are the challenges?
When the GPIO is HIGH (3.3V), the voltage between Gate and Source of the FET is zero since the Gate is tied to +3.3V through R4 and the Source follows the GPIO. The FET is not conducting between its Source and Drain connections. In this state the Output is pulled to +5V by R5.
(BTW: R4 is only there to charge/discharge the parasitic input capacitance of the FET and could be omitted entirely for an ideal FET.)
When the GPIO goes low, it pulls the Source of the FET to GND (0V). That increases the voltage across Gate and Source of the FET (VGS) to 3.3V, causing the FET to become conductive between Source and Drain, and consequently pull the output to GND.
The major flaw of this circuit is that its usefulness degrades towards higher frequencies (shorter pulses) and capacitive loads because the only force pulling the output to HIGH is the pull-up resistor R5. So the load capacitance gets charged through R5 only. You can mitigate the effect partially by selecting a smaller R5 but the tradeoff will be increased power consumption of the circuit.
A WS2813 signal input imposes a capacitive load of 15 pF onto the level shifter’s output according to its datasheet. That doesn’t sound like a lot, but you can see from the plots that we have only few nanoseconds time to charge the parasitic capacitor. It also partially adds up with the reverse transfer capacitance of the BSS138 FET (Crss=6pF according to the datasheet).
The result is clearly visible in the oscilloscope plot: the leading edges are not sharp and therefore reducing the pulse duration acquired by the pixel’s input, depending on the input voltage threshold of the pixel (0.7 x VDD = 3.5V @ 5V according to the datasheet). The effect of sampled pulse shortening gets worse with rising input HIGH threshold of the pixel.
NB: The design frequency of this circuit would be 1 / (433 ns x 2) = 1.155 MHz
So what would be a better solution?
Better Circuit: TTL logic gates
We need a circuit with well-defined and matching input voltage thresholds. TTL gates represent such circuits. For a power supply of 5V, a TTL input is guaranteed logic LOW when the input voltage is below 0.8V. That same input is guaranteed logic HIGH when the input voltage is above 2.0V.
That perfectly matches our 3.3V GPIO output voltage!
The output weakness of the MOSFET circuit does not apply to a TTL gate’s output since it can drive to HIGH as well as to LOW by means of a circuit known as “Totem Pole” push-pull transistor output stage. 74HCT and 74AHCT chips will drive the output to a voltage close to VCC.
This output stage gives much sharper leading edges as can be seen on the lower right oscilloscope picture.
So this is actually the circuit I would suggest for the application. A large variety of TTL chips can be used: 74HCTXX series, 74AHCTXX series, but not 74HC or 74AHC!
Which logic function you choose is up to your liking and availability in your parts bin. The input characteristics are the same for all of them (with a slight deviation for those with Schmitt trigger inputs like the 74XX14).
- 5V power supply: the power of the power supply depends on the number of leds. A pixel has 3 leds (RGB), each led drains a max of 20mA, so a pixel drains a max of 60mA (3 * 20mA). So the total current that the power supply must deliver is 60mA times the number of pixels. For example 80 pixels: 60mA * 80 = 4800mA = 4.8A. Also the ESP8266 is powered by the power supply so in this example a power supply of 6A (30W) will do.
note: connect the ledstrip from both sides to the power supply
Tasmota Configuration~
In the Configuration -> Configure Module page, select the following:
- D1 GPIO5 : WS2812

Tasmota Main~
