Shelly 1~
The Shelly 1 is supported in Tasmota from version 6.2.1.7

Flashing~
There are two options to get Tasmota onto your Shelly:
- OTA update with an intermediate firmware (preferred - can be done in an already installed state)
- The common way using a serial adapter. DO NOT DO THIS WHEN CONNECTED TO AC MAINS!
OTA Update~
Follow the guide from this repository: https://github.com/arendst/mgos-to-tasmota
⚠️️Special Shelly Attention⚠️️~
DO NOT CONNECT ANYTHING TO ANY GPIOs OF THESE DEVICES!!! (No sensors, no switches, nothing)
The GPIOs on the Shelly are connected to AC power! Only use a Shelly as designed.
There is possibility to attach DS18B20 or other sensors BUT only using Digital Voltage Isolator For example the company sells Temperature Sensor AddOn for Shelly 1/1PM with DS18B20. This should not fool you, never ever attach any sensor directly to the GPIOs - this expansion board uses TexasInstruments ISO7221 for voltage isolation. More information and Tasmota support for the extension board at https://github.com/arendst/Tasmota/issues/7469.
Do not connect AC power and the serial connection at the same time The GND connection of the Shelly is connected to the live AC wire. Connecting serial with your PC will fry your PC.
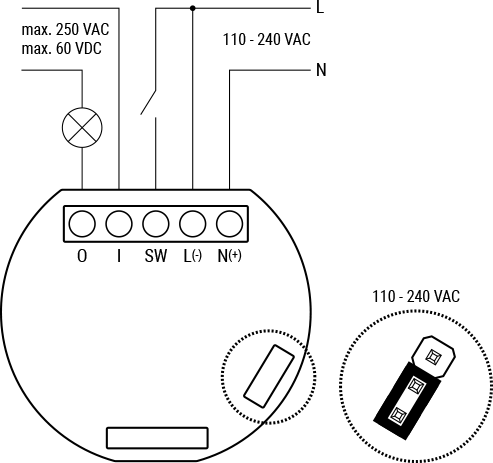
Check the correct jumper position before connecting AC power to Shelly 1. If the jumper is set to 12V you will destroy your Shelly!
An ESP8266 with 2MB flash single relay device 42mm "round" in size.
Serial Connection~
Shelly1 comes with a partially exposed programming/debug header which can be used to flash Tasmota on the device. A serial-to-USB adapter is needed as well as a reliable 3.3V source with at least 350 mA drive capability. The following diagram shows the device pinout.
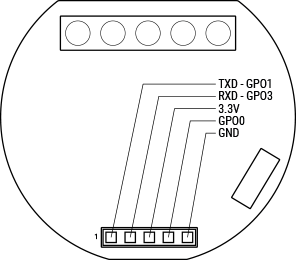
Flash mode~
To be able to flash the Tasmota firmware you need to get into flash mode. Therefore connect a wire from GPIO0 to ground. For further information have a look at Hardware Preparation.
⚠️️WARNING⚠️️~
Please note what version of the Shelly 1 you have (V1, V2 or V3). The V2 user guide is incorrect. The labels on the V2 switches are WRONG! The following image shows how to connect the device to mains power.
Video tutorial by digiblurDIY~

Video tutorial by BurnsHA~