The Sonoff RF Bridge has two separate chips to handle the Wi-Fi (ESP8285) and RF (EFM8BB1) communications respectively. It is used to send and receive codes with 433.9MHz frequency RF devices. Codes received from RF devices such as remote controls is passed to the onboard ESP8285 via the serial interface. The code data is relayed via MQTT. Similarly, the Bridge receives commands over Wi-Fi and sends the encoded data to the RF chip to control an RF device. Thus, the Sonoff RF Bridge "bridges" communications between RF and Wi-Fi.
Attention ⚠️️⚠️️⚠️️ There are now 3 versions of the Sonoff RF Bridge 433: the R1 , R2 V1.0 and R2 V2.2.
Users reported limited success flashing Tasmota to R2 V2.2.
RF firmware OB38S003 is available as tested with simple protocol receiving, but is incomplete and requires flasher tool.
Flash Tasmota~
Please read the Hardware Preparation article for general flashing instructions.
Access the serial interface available on the 5-pin header next to the switch as can be seen in the image.

To flash the ESP8285, first move the switch position towards the 5-pin header.
Connect the serial-to-USB adapter and press the button on the edge while powering the device in order to put the ESP8285 into programming mode in order to upload the Tasmota firmware.
After flashing the ESP8285, be sure to move the switch position away from the 5-pin header to restore the connection to the RF microcontroller.
Configure the device as usual and select module Sonoff Bridge (25). During normal operation the serial interface is used at 19200 baud to communicate with the RF microcontroller. Therefore serial logging (SerialLog 0) must be disabled.
IMPORTANT: In the Module configuration GPIO4 and GPIO5 must be left as 00 None On R2 versions of the Sonoff RF Bridge, a hardware modification is required in order to use these GPIOs.
Video tutorial by alsolh~

RF Firmware~
The RF chip has its own firmware. The device is shipped with Itead firmware which supports a limited set of RF devices limited to mostly just Sonoff devices (a single 24-bit RF protocol). Some later versions of the factory firmware will only relay received RF data once the transmitting device stops. This is fine for remote controls or devices such as door sensors. But for devices such as smoke detectors, this behavior is not acceptable.
Custom firmware is available for the RF chip which is commonly referred to as 'Portisch'. By updating the firmware on the RF chip, new types of devices and new features become usable. It also relays the RF data when the data is received rather than waiting until the transmitter stops.
Tasmota supports the original Sonoff RF firmware and the Portisch firmware.
RF Firmware Upgrade~
The RF upgrade requires wiring the bridge and then flashing the firmware via the Tasmota web UI.
Attention ⚠️️⚠️️⚠️️ There are now 3 versions of the Sonoff RF Bridge 433: the R1 , R2 V1.0 and R2 V2.2.
R1

R2 V1.0 RF firmware flashing:

R2 V2.2 Read about it in Discussions : New Sonoff RF Bridge Board Layout (R2 v2.2)

Flashing RF Firmware~
- Make sure you have previously flashed a Tasmota binary built with
RF_FLASH. Refer to the builds table for pre-compiled binaries which include this feature. Otherwise the "Magic byte is not 0xE9" error will occur. - Set the module type to
Sonoff Bridge (25) - Connect two wires (this will be different depending on the
Sonoff RF Bridge 433hardware version):- For
R1: ConnectGPIO4 to C2CkandGPIO5 to C2D. - For
R2: ConnectGPIO4 to C2DandGPIO5 to C2Ck. ( The text on the R2 PCB silkscreen is switched. Therefore this is the same wiring as on the R1)
- For
- Switch the ON/OFF switch on the board to 'OFF' (to disconnect RF from ESP).
- Power up the bridge via the 3.3V & GND pins. (See below if you need to power the device through the USB power port)
-
Obtain the Portisch firmware file: (Clicking on the file link on the GitHub web site does not work since this will download the GitHub preview/content of the file rather than the raw file contents)
- Download the entire contents of the Tasmota GitHub project project via the green
Clone or Downloadbutton to ensure that the firmware hex files are downloaded properly. The firmware files are located in the./tools/fw_SonoffRfBridge_efm8bb1/folder. Select the newest available hex file. Otherwise you may geterror "Magic byte is not 0xE9". - As an alternative use wget/curl to download the raw file (https://github.com/arendst/Tasmota/tree/master/tools/fw_SonoffRfBridge_efm8bb1) directly. Select the newest available hex file. Otherwise you may get
error "Magic byte is not 0xE9". PowerShell example:
wget https://github.com/arendst/Tasmota/raw/master/tools/fw_SonoffRfBridge_efm8bb1/RF-Bridge-EFM8BB1-XXXXXXXX.hex -OutFile .\RF-Bridge-EFM8BB1-XXXXXXXX.hex - Download the entire contents of the Tasmota GitHub project project via the green
-
Go to the Web UI Firmware Upgrade > Upgrade by File Upload (introduced in v6.0.0a)
- In the file selection dialog, navigate to the folder on your computer where you saved the hex file from step 6.
- Click Start Upgrade. The flashing should complete within 60 seconds. Device will restart after upgrade completes.
- Disconnect wiring and put the ON/OFF switch on the board back to 'ON' to enable the RF again.
Hardware Preparation for USB powered flashing~
This section applies only to the R2 revision of the Sonoff RF Bridge
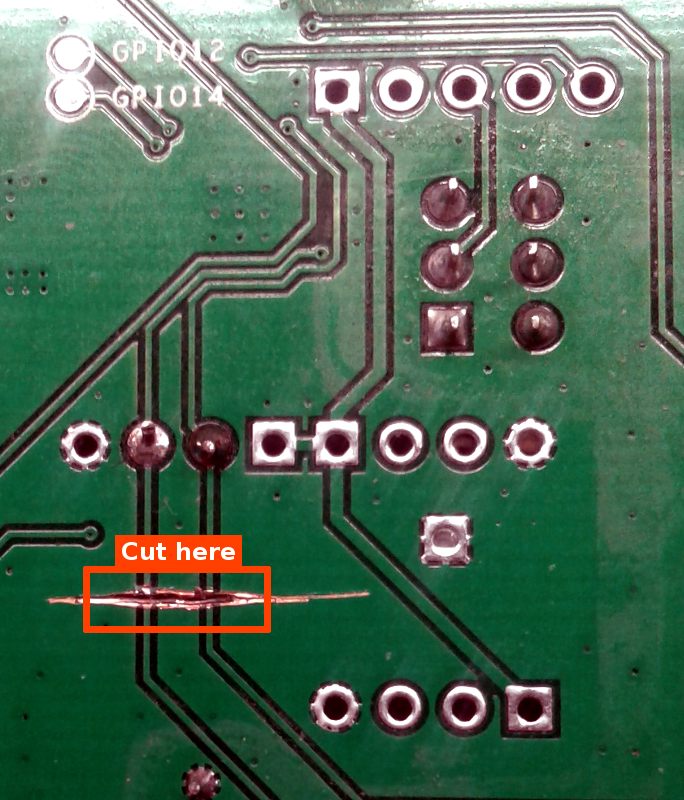
Apply this modification only if you intend to use USB for powering the device during flash process or if you want to use GPIO4 or GPIO5 for other purposes with the RF Bridge.
The R2 revision boards connect the GPIO4 and GPIO5 pins to the USB data lines of the power connector. Compliant USB chargers/power supplies are expected to short the two pins together, which is a problem. These lines are not used by the original firmware, nor by Tasmota. The traces toward the USB power connector need to be cut to avoid interference by the USB wiring. Removing these connections does not interfere with the normal Bridge functionality.
Operation~
The Sonoff RF Bridge is able to learn up to 16 different fixed code remote control commands as provided by PT2260, PT2262, PT2264 and EV1527 transmitters. It was not able to recognize the latest Klik Aan Klik Uit (KaKu) remote control signals but some people managed to use the fixed code KaKu devices like PAR-1000 receiver and PAT-103 transmitter.
Tasmota provides default remote control commands to all 16 keys so you can start using the bridge with a Sonoff 4Ch Pro or Sonoff RF device without having the bridge have to learn remote control commands.
See RF Bridge commands.
Portisch Firmware Specific Usage~
These sections only apply to the custom Portisch firmware.
Learning Commands with Portisch Firmware~
In order to learn Buttons from your remote, go to the Console of your RF Bridge. There, enter rfraw 177 and push the buttons on your remote. Repeat each button 2-3 times, as the signal may be different for each try. This will give you a so called B1 code of your button, which needs to be converted to a B0 code (see below).
Sending Commands with Portisch Firmware~
The commands learned with Portisch Firmware cannot be stored in device memory. Instead, they must be sent as a command.
Example using MQTT:
cmnd/sonoffRFBridge/Backlog RfRaw AAB0210314016703F924180101011001100110010101100110011001010110010101100255; RfRaw 0
B1 to B0 Conversion Tools~
After learning how bitbucket works from the Portisch wiki, use one of these tools to help convert received B1 sniffing messages to the right 'B0' format to send in the 'RfRaw' command.
- Online
Process: - Enter
rfraw 177in the Sonoff Bridge web UI Console - Press a function (each Button 2-3 times) on your remote control
- Copy the JSON payload output from the Console and paste it in the online converter and click
Converte.g.,{"RfRaw":{"Data":"AA B1 03 07F9 0124 37DC 010101010101101001010101101010100102 55"}} -
The utility will return the resulting B0 string to use in setting up commands in the RF Bridge e.g.,
AA B0 1A 03 08 07F9 0124 37DC 010101010101101001010101101010100102 55 -
CLI (rename file from
BitBucketConverter.txttoBitBucketConverter.py)
In the command line give theB1message string and the retries value (in decimal): e.g.,BitBucketConverter.py "AA B1 04 07EB 0157 00FD 3EBC 010101010101101001010101101010100103 55" 20
Command Line : "AA B1 04 07EB 0157 00FD 3EBC 010101010101101001010101101010100103 55" 20 Result: RfRaw AAB01C041407EB015700FD3EBC01010101010110100101010110101010010355
- Batch
Process: - Enter
rfraw 177in the Sonoff Bridge web UI Console - Press each function (each Button 2-3 times) on your remote control
- Save everything from the console that happened after
rfraw 177to a text file - Run bitbuckedconverter.py -f console.txt
- Each line of console.txt will be converted into a B0 string and displayed
- Run bitbuckedconverter.py -f console.txt -e
- Each line of console.txt will be converted into a B0 string and sent to the Bridge
Then:
* If the device reacted as expected, you can enter a name of the button (e.g., "light")
* Else enter nothing to try the next
* Repeat this until all lines have been tried
* The tool will create a list of buttons and their B0 codes that have worked (i.e. for which you have specified a name)
* In the end you can test all of these codes
- "Raw sniffing"
As suggested by the Portisch firmware, perform the following:
In the web UI Console, send RfRaw AAB155
This will result in two consecutive messages: 1. The first one tells you that you are using one of the new firmware commands 22:58:44 MQT: tele/sonoffRFbridge/RESULT = {"RfRaw":"ON"}
- The second one tells that the EFM8BB1 RF chip new firmware accepts the command and enters raw sniffing mode ('A0' means 'ACK')
22:58:44 MQT: tele/sonoffRFbridge/RESULT = {"RfRaw":{"Data":"AAA055"}}
After that keep pushing one of the buttons on the remote.
MQT: tele/sonoffRFbridge/RESULT = {"RfRaw":{"Data":"AAA055"}}
MQT: tele/sonoffRFbridge/RESULT = {"RfRaw":{"Data":"AA B1 04 07F0 0128 00F2 3822 010101010101101001010101101010100103 55"}}
MQT: tele/sonoffRFbridge/RESULT = {"RfRaw":{"Data":"AA B1 03 07F9 0124 37DC 010101010101101001010101101010100102 55"}}
MQT: tele/sonoffRFbridge/RESULT = {"RfRaw":{"Data":"AA B1 03 07F9 0124 37DC 010101010101101001010101101010100102 55"}}
MQT: tele/sonoffRFbridge/RESULT = {"RfRaw":{"Data":"AA B1 03 07F4 0126 37D2 010101010101101001010101101010100102 55"}}
MQT: tele/sonoffRFbridge/RESULT = {"RfRaw":{"Data":"AA B1 03 07F5 0127 37D2 010101010101101001010101101010100102 55"}}
MQT: tele/sonoffRFbridge/RESULT = {"RfRaw":{"Data":"AA B1 03 07F7 0125 37DC 010101010101101001010101101010100102 55"}}
MQT: tele/sonoffRFbridge/RESULT = {"RfRaw":{"Data":"AA B1 03 07F9 0125 37D2 010101010101101001010101101010100102 55"}}
MQT: tele/sonoffRFbridge/RESULT = {"RfRaw":{"Data":"AA B1 03 07F4 0123 37C8 010101010101101001010101101010100102 55"}}
MQT: tele/sonoffRFbridge/RESULT = {"RfRaw":{"Data":"AA B1 03 07F9 0124 37D2 010101010101101001010101101010100102 55"}}
MQT: tele/sonoffRFbridge/RESULT = {"RfRaw":{"Data":"AA B1 03 07FC 011E 37D2 010101010101101001010101101010100102 55"}}
MQT: tele/sonoffRFbridge/RESULT = {"RfRaw":{"Data":"AA B1 03 07F8 0125 37D2 010101010101101001010101101010100102 55"}}
MQT: tele/sonoffRFbridge/RESULT = {"RfRaw":{"Data":"AA B1 03 07F8 0124 37D2 010101010101101001010101101010100102 55"}}
MQT: tele/sonoffRFbridge/RESULT = {"RfRaw":{"Data":"AA B1 03 07F9 0125 37D2 010101010101101001010101101010100102 55"}}
MQT: tele/sonoffRFbridge/RESULT = {"RfRaw":{"Data":"AA B1 03 07F8 0122 37C8 010101010101101001010101101010100102 55"}}
MQT: tele/sonoffRFbridge/RESULT = {"RfRaw":{"Data":"AA B1 03 07F1 012D 37D2 010101010101101001010101101010100102 55"}}
MQT: tele/sonoffRFbridge/RESULT = {"RfRaw":{"Data":"AA B1 03 07F4 0123 37C8 010101010101101001010101101010100102 55"}}`
MQT: tele/sonoffRFbridge/RESULT = {"RfRaw":{"Data":"AA B1 03 07F8 0128 37C8 010101010101101001010101101010100102 55"}}
MQT: tele/sonoffRFbridge/RESULT = {"RfRaw":{"Data":"AA B1 03 07F9 0124 37D2 010101010101101001010101101010100102 55"}}
MQT: tele/sonoffRFbridge/RESULT = {"RfRaw":{"Data":"AA B1 03 07F4 0124 37C8 010101010101101001010101101010100102 55"}}
MQT: tele/sonoffRFbridge/RESULT = {"RfRaw":{"Data":"AA B1 03 07F9 0124 37C8 010101010101101001010101101010100102 55"}}
MQT: tele/sonoffRFbridge/RESULT = {"RfRaw":{"Data":"AA B1 03 07F4 0123 37D2 010101010101101001010101101010100102 55"}}
Notice that this sequence of messages all start with 'AA' then 'B1' and the last byte '55'
The reason for pushing the remote button for several seconds is to get enough 'AA B1 ...... 55' sequences to select the best one to be transmitted back.
Then discard the sequences with 'data values' not equal.
In the example 'data values' are the 010101010101101001010101101010100102 string.
Notice that before that 'data values' string there are several 2 byte values (they are called 'buckets'); they are time values in microseconds. The number of 'buckets' is indicated in a previous byte (in the example a 3 or a 4).
In the example, discard the first message (it contains 4 buckets, whereas the rest have only 3 buckets). Examine the values on the buckets in order to choose the message where more buckets are 'similar'.
For example messages with '37D2' in the third bucket are good candidates. Messages with '0124' in the second bucket are also good candidates. First bucket values are very similar; '07F8' can be a good one.