Sonoff RF
Serial Flashing~
The Sonoff RF needs some tweaking as the connection needed during programming between the button and GPIO0 might not be present.
This connection must be removed after the conversion to Tasmota or a button press will send the device in an ON/OFF loop.
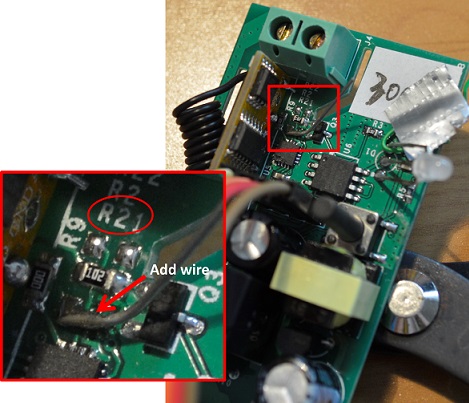
This can be achieved by shorting both solder pads of R21 with a small screwdriver while holding down the button during programming. This can be a bit fiddly, and ideally you should check the bootloader output over serial to see whether you managed to get it into programming mode. Alternatively, Phalox installed a jumper wire (explained in the picture below). Remember to remove it after programming.
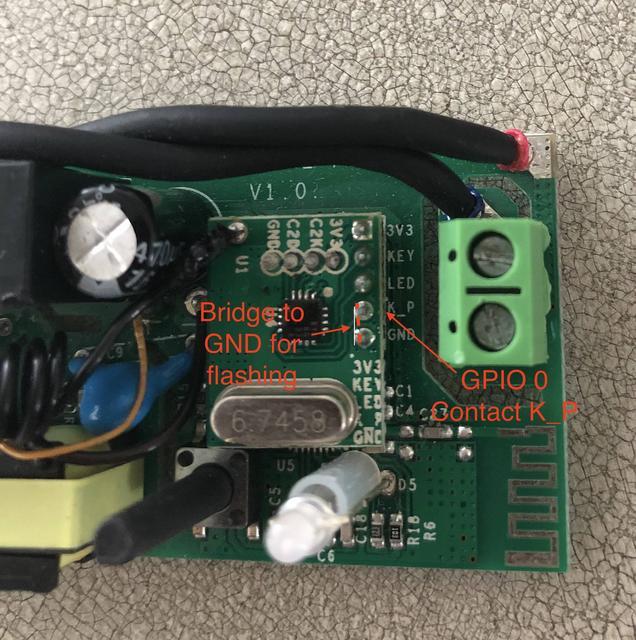
The R2 V1.0 version of the Sonoff RF uses an ESP8285 which is covered by a horizontally orientated RF expansion board. Entering flash ready mode can be achieved by grounding K_P (which is connected to GPIO0) to the neighbouring GND pin on the RF board during power on.
Pairing the iTead RF remote controller is the same as with the original iTead software: - two short button presses will blink a red led shortly and start RF signal recognition. Three longer blinks signal RF reception. - three short button presses will keep the red led on for some seconds and erase the known RF code.
I was unable to pair the Sonoff RF 434MHz receiver with my KaKu switches but the iTead provided remote control works just fine.
Pairing a RF remote control~
During programming a connection for R21 is needed in order to use a button press to ground GPIO0.
To pair a RF remote control with the Sonoff RF it is important that there is NO connection made for R21.
User gadjet installed a jumper in place of R21 allowing easy programming (jumper in), pairing (jumper out) and normal use (jumper out). The Slampher RF Revision 2.0 can have the same modification applied, but it requires its jumper across R3.
Pairing Instructions~
Pairing the iTead RF remote controller is the same as with the original iTead software: - two short button presses will blink a red led shortly and start RF signal recognition. Three longer blinks signal RF reception. - three short button presses will keep the red led on for some seconds and erase the known RF code.
I was unable to pair the Sonoff RF 434MHz receiver with my KaKu switches but the iTead provided remote control works just fine.
Version 2 Pairing Instructions~
RF units produced after 6/2018 use a different procedure for pairing.
- Press and hold the button for 3-seconds until the red light flashes once, then press then button on your remote to program.
- Press and hold for button for 5-seconds until the red light flashes twice to clear remote programming.