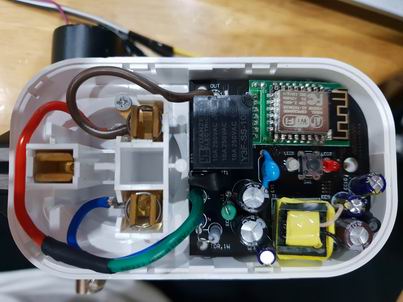
Tuya Smart Plug Models ESP8266MOD by AI THINKER and ESP 12F by TUYA LN 0026
WARNING! The current version of these plugs does not come with an ESP8266, but with a custom TUYA chip, which can't be flashed with Tasmota.
These are simple, No-Name smart plugs (I bought these at AliExpress). One of them has ESP8266MOD chip (by AI-THINKER), other one has ESP-12F chip (by TUYA L/N 0026). Both are actually same chips and are flashed the same way.


You need to solder 5 wires: 1. VCC (3.3V) 2. GND (GROUND) 3. Rx 4. Tx 5. GPIO0
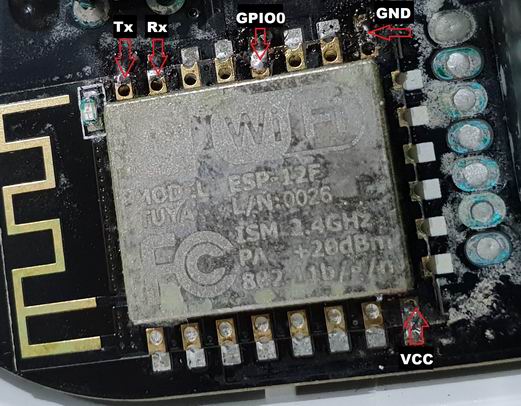


To put this chips into flash mode, we need to jump wire GPIO0 and GROUND, before you plug your USB adapter into computer. Release jump wire after couple of seconds. Red LED (bottom one) should slightly lit up. Now you can start flashing process.


When flashing process is complete, you can unplug USB adapter. Your TUYA smart plug is TASMOTIZED.
THIS IS OPTIONAL!!! You can now use Termite app, to load your router WiFi SSID and password using below commands: (just copy and paste all of it, but put your details in). In Termite settings, check your COM number, where adapter is plugged in and select 115200.
Backlog SSID1 YOUR_SSID_NAME; Password1 YOUR_WIFI_PASSWORD; MqttHost MQTT_INTERNAL_IP_ADDRESS; MqttUser MQTT_USER_NAME; MqttPassword MQTT_PASSWORD; GPIO2 56; GPIO12 21; GPIO13 17
After that, Termite should tell you, what IP address was assigned to your smart plug. Put that IP address in your browser and you should see Tasmota GUI. Go into Configuration > Configure Module > Change to Generic (and click Save). After restart, go into Configuration > Configure Module and change GPIO's as on screen below.
You can change between D4 GPIO2 56 LED1i and D4 GPIO2 52 LED1 (Blue led on when device is on, or blue led on when device is off) 
That's it, now your smart plug will flash both red and blue leds and smart plug button should respond to presses.
Special thanks to Travis Griggs for his help with flashing process (I based this tutorial on his own: LINK)